


Part No. 1104849 137 3G Storm Series
®
Wheelchairs
RWD WHEELCHAIRS SECTION 15
RWD WHEELCHAIRS
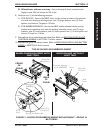
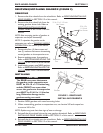
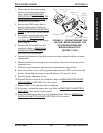
ANTI-TIPPER WHEEL REPLACEMENT (FIGURE 17)
1. Remove the locknuts, hex screws and
spacers that secure the anti-tipper
wheels to the anti-tip bracket
2. Replace anti-tipper wheel(s) and
torque existing hardware to 156 in-lbs.
DO NOT overtighten.
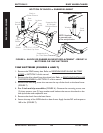
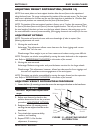
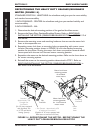
REMOVING/INSTALLING THE 3-INCH ANTI-TIP ASSEMBLY
(FIGURE 18)
1. Remove the 5/16-18 x 3-1/2-inch hex head cap screw, two (2) short spacers, two (2)
large washers, and locknut that secure the rear of the anti-tip bracket and shock (or
rubber element) to the suspension arm. Save hex head mounting screw, two (2)
small spacers, and locknut for installation of the 4-inch active anti-tip assemblies.
2. Remove the 5/16-18 x 3-1/4-inch hex head cap screw, two (2) small washers, long
spacer and locknut that secure the front of the anti-tip bracket to the the suspension
arm. Save hex head mounting screw and locknut for installation of 4-inch active
anti-tip assemblies.
FIGURE 18 - REMOVING/INSTALLING THE 3-INCH ANTI-TIP ASSEMBLY
5/16-18 x 3-1/2-inch
Hex Head Cap Screw
Short
Spacer
Large
Washer
Locknuts
Long
Spacer
Anti-tip
Bracket
Shock or
Rubber Element
Suspension Arm
for Gearless/Brushless
Motors (Reference)
Suspension Arm
for 4 Pole Motors
(Reference)
5/16-18 x 3-1/4-inch
Hex Head Cap Screw
Small
Washer
Anti-Tipper
Wheel
Spacer
FIGURE 17 - ANTI-TIPPER WHEEL
REPLACEMENT
Spacer
Locknut