27
F
R
A
M
E
PROCEDURE 4FRAME
NOTE: DO NOT close the quick release levers or tighten the
hex screws that secure the axle tube to the camber clamps
at this time.
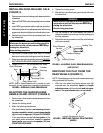
WARNING
NEVER position the camber inserts in the axle tube
with more than 3-inches (12 indexing marks show-
ing) of the camber insert outside of the axle tube.
The camber inserts will not be securely tightened in
the axle tube resulting in possible injury to the user or
damage to the wheelchair.
11. Install the rear wheels and camber inserts into the new
axle tube and slide the camber inserts to the position
noted in STEP 1. Make sure there is no more than 3-
inches (12 indexing marks) of the camber inserts out-
side of the axle tube.
12. Slide the indexing ring on the camber insert until it is flush
with the camber clamp
NOTE: To maximize rollability: Before using the wheelchair,
make sure both camber inserts are set to the same indexing
notch. This will make sure the distance between the rear
wheel and the wheelchair is the same on both sides.
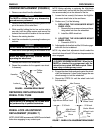
13. Adjust the axle tube. Refer to ADJUSTING THE AXLE
TUBE in this procedure of the manual.
NOTE: The performance of the wheelchair will be affected if
the axle tube has not been adjusted to correct the toe in/toe
out of the wheelchair.
14. Ensure the camber clamps are closed. Refer to OPEN-
ING/CLOSING CLAMPS in this procedure of the manual.
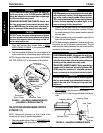
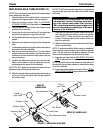
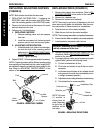
REPLACING AXLE TUBE (FIGURE 13)
NOTE: There is no need to remove the two (2) camber clamps
when replacing the axle tube.
1. Note the position of the camber inserts so they can be
installed to the original position in the new axle tube.
2. Open the camber clamps. Refer to
OPENING/
CLOSING CLAMPS in this procedure of the manual.
3. Remove the two (2) rear wheels and camber inserts
positioned in the axle tube.
4. Loosen, but do not remove the two (2) set screws that
secure the toe adjustment rings to the axle tube.
5. Pull the existing axle tube through one (1) of the camber
clamps.
6. Remove the toe adjustment rings from the existing axle
tube.
7. Pull the existing axle tube through the other camber clamp
and remove from the wheelchair.
8. Slide the new axle tube through one (1) of the camber
clamps. Make sure the notches in the axle tube are to-
wards the rear of the wheelchair and the slots in the axle
tube are facing up.
9. Install the toe adjustment rings onto the new axle tube.
Make sure the stops on the toe adjustment rings are
facing towards the outside of the wheelchair.
NOTE: DO NOT tighten the set screws that secure the toe
adjustment rings to the axle tube at this time.
10. Slide the new axle tube through the other camber clamp
until the end of the axle tube is flush with the outside of
the camber clamp.
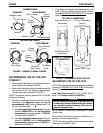
FIGURE 13 - REPLACING AXLE TUBE
Camber Clamp
Axle Tube
Toe Adjustment Ring
Slot in
Axle Tube
Camber Insert
REAR OF
WHEELCHAIR
Notch in
Axle Tube
Camber Insert
Indexing Ring
Toe Adjustment Ring
Set Screw
FRONT OF WHEELCHAIR


