28
ENGLISH DEUTSCH
Basic Recording Einfache Aufnahmen erstellen
Making your First Recording
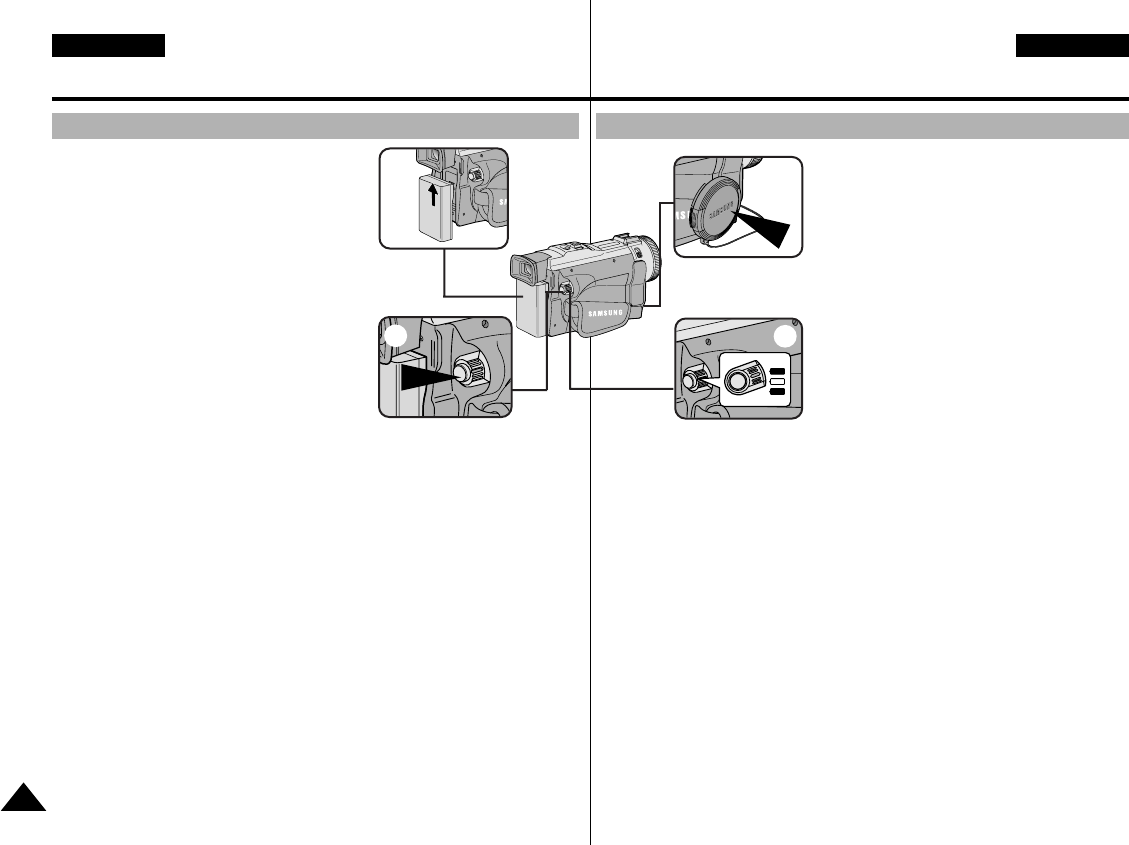
1. Connect a Power source to the camcorder.
(see page 23) (a battery pack or a AC
power adapter).
■
Insert a cassette. (see page 27)
2. Remove the LENS CAP and hook it onto
the hand strap.
3. Set the power switch to the CAMERA
position.
■
Open the LCD monitor and make sure
that STBY is displayed.
■
If the protection tab of the cassette is
open, STOP and PROTECTION! will
be displayed.
■
Make sure the image you want to record appears in the LCD monitor
or viewfinder.
■
Make sure the battery level indicates that there is enough remaining
power for your expected recording time.
4. To start recording, press the START/STOP button.
■
REC is displayed in the LCD.
To stop recording, press the START/STOP button again.
■
STBY is displayed in the LCD.
1. Schließen Sie eine Stromquelle an - siehe
Seite 23 (Akku oder Netzanschluss).
■
Legen Sie eine Kassette ein - siehe
Seite 27.
2. Nehmen Sie die Objektivkappe ab, und
hängen Sie sie in die Halteschlaufe ein.
3. Stellen Sie den Betriebsmodus-Schalter
auf die Position CAMERA.
■
Klappen Sie den LCD-Monitor aus, und
prüfen Sie, ob auf dem LCD-Monitor die
Anzeige STBY für Standby
(Betriebsbereitschaft) erscheint.
■
Wenn der Löschschutz der Kassette aktiviert ist, wird STOP and
PROTECTION! angezeigt.
■
Vergewissern Sie sich, dass Ihr Aufnahmemotiv auf dem LCD-Monitor
oder im Sucher angezeigt wird.
■
Überprüfen Sie anhand der Ladezustandsanzeige, ob der Akku
ausreichend geladen ist.
4. Zum Starten der Aufnahme drücken Sie die Taste START/STOP.
■
Auf dem Monitor wird REC angezeigt. Zum Beenden der Aufnahme
drücken Sie erneut die Taste START/STOP.
■
Auf dem Monitor wird wieder STBY angezeigt.
Ihre erste Aufnahme
4
3
2
1
00511F VP-D80 UK+GER (28~59) 2/10/03 11:38 AM Page 28


