REALIZACIÓN DE LA PRIMERA GRABACIÓN
1.
Conecte la videocámara a una fuente de alimentación eléctrica.
➥
página 17
(Una batería o un adaptador de alimentación de CA)
➥
página14,17
Inserte un casete.
➥
página 34
Para grabar en una tarjeta de memoria, inserte la tarjeta de
memoria. (sólo SC-D383/D385)
➥
página 72
2. Retire la tapa del objetivo.
3.
Deslice hacia abajo el interruptor POWER
para encender.
Abra la pantalla LCD.
Coloque el interruptor de Selección en
CARD o TAPE. (sólo SC-D383/D385)
Presione el botón MODE para denir
Camera (Cam) ( ).
- Asegúrese de que aparece
STBY.
Si la pestaña de protección del
casete está abierta (protegida),
aparecerá STOP y "Protection !
(¡ Protección !)" Libere la pestaña
de protección contra escritura para grabar.
Asegúrese de que la imagen que desea
grabar aparezca en la pantalla LCD.
Asegúrese de que el nivel de la batería indique que tiene
suciente energía para grabar durante el tiempo deseado.
Puede seleccionar el modo de grabación que desee.
➥
página 44
4. Presione el botón Iniciar/Parar grabación para
empezar a grabar.
Aparece "REC
●
" en la pantalla LCD.
Para detener la grabación, presione de nuevo el
botón Iniciar/Parar grabación.
Aparece "STBY" en la pantalla LCD.
Expulse la batería al terminar de grabar para evitar un consumo
innecesario de la batería.
La videocámara con miniDV proporciona dos botones Iniciar/
Parar grabación. Uno se encuentra en la parte trasera de la
videocámara y el otro en el panel LCD. Seleccione el botón
Iniciar/Parar grabación según el uso que haga.
•
•
•
•
•
•
•
•
•
•
•
•
•
MAKING YOUR FIRST RECORDING
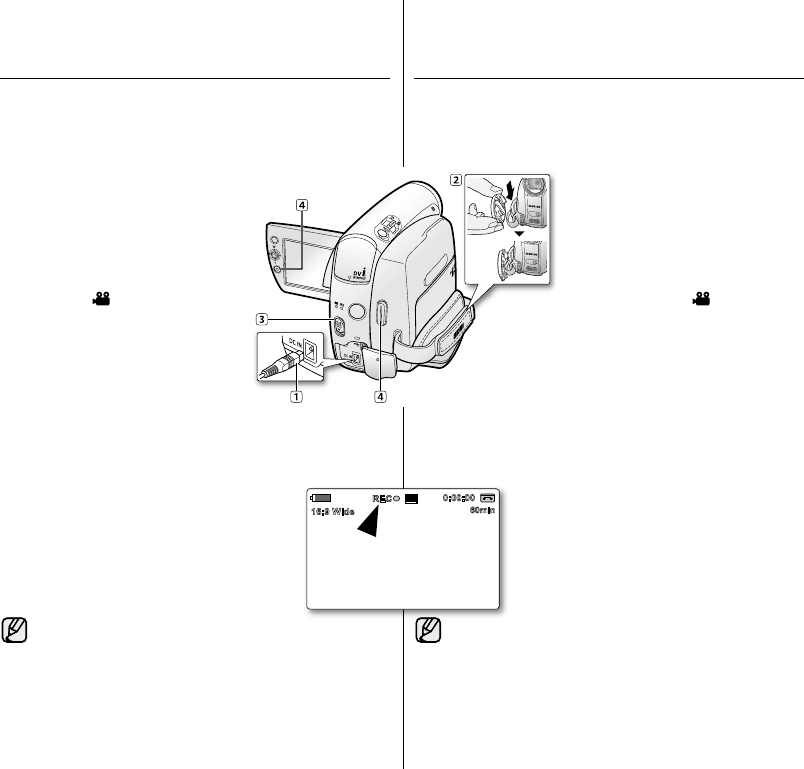
1. Connect a power source to the camcorder.
➥
page 17
(A battery pack or a AC power adapter)
➥
page 14,17
Insert a cassette.
➥
page 34
If you want to record on a memory card, insert the memory card.
(SC-D383/D385 only)
➥
page 72
2. Remove the lens cover.
3. Slide the POWER switch downwards to
turn on the power.
Open the LCD screen.
Set the Select switch to CARD or
TAPE. (SC-D383/D385 only)
Press the MODE button to set
Camera ( ).
- Make sure that
STBY is displayed.
If the write protection tab of the
cassette is open (set to save), STOP
and "Protection !" will be displayed.
Release the write protection tab to
record.
Make sure the image you want to
record appears on the LCD screen.
Make sure the battery level indicates that there is enough
remaining power for your expected recording time.
You can select a record mode of your choice.
➥
page 44
4. To start recording, press the Recording start/stop
button.
"REC
●
" is displayed on the LCD screen.
To stop recording, press the
Recording start/stop
button again.
"STBY" is displayed on the LCD screen.
Eject the battery pack when you nish the recordings to
prevent unnecessary battery power consumption.
The miniDV camcorder provides two Recording start/stop
buttons. One is on the rear side of the camcorder and the
other one is on the LCD panel. Select the Recording start/
stop button according to the use.
•
•
•
•
•
•
•
•
•
•
•
•
•
10Sec
16Bit
S
No Tape !
W T
29
1/50
M
60min
0:00:00
SP
16:9 Wide
REC
M
O
D
E
P
O
W
E
R
C
H
G
V
O
L
MENU
O
P
E
N
O
P
E
N


