


Additive Feeders Chapter 4: Operation 26 of 55
7. Install the enclosure cover.
8. Remove any lockout/tagout devices in use as per procedures in place at your
facility, then connect the controller to the power source and power the unit
up.
9. Press the Enter button until parameter selection mode is entered. When the
drive is in Parameter-Selection Mode, the far left of the display will be a “P.”
10. Use the Up and Down arrow buttons to navigate to the desired parameter.
11. When the parameter number to be changed is displayed press the Enter
button to enter Value Mode. When in Value Mode, the two dots which form
the colon between digits two and three will alternately flash.
12. Use the Up and Down arrow buttons to change the parameter’s displayed
value.
13. Press the Enter button to return to Parameter-Selection Mode.
14. Use the Up and Down Arrow buttons to go to the next parameter to be
modified. Repeat as required for any remaining parameters.
15. When all program modifications are completed, use the Up and Down Arrow
buttons to go to parameter “0” then press the Enter button to return to run
mode.
16. Remove the power source from the controller. Following the procedures in
your facility, lockout or tagout the power source.
17. Remove the dust cover from the control enclosure.
18. At the connection end of the drive lift the black plastic cover up slightly then
slide it out of the back of the drive.
19. Locate the jumper labeled “JP1”.
20. Move the JP1 jumper from the “ON” position to the “OFF” position.
21. Slide the black plastic cover back into position.
22. Install the enclosure cover.
23. Remove any lockout/tagout devices in use as per procedures in place at your
facility, then connect the controller to the power source and power the unit
up.
The drive is now ready to be used.
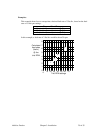
The required programming values for Injection Mold Applications are located on
drawing number A0541236, one of three drawings that are included with the additive