


Additive Feeders Chapter 4: Operation 25 of 55
editing purposes. Pressing the Up or Down button will increase or decrease the selected
parameter number on the display. Although the parameter numbers are in numerical order,
some numbers are skipped. These numbers represent reserved parameters that are not yet
implemented and are not displayed. Once the desired parameter number is displayed, a press
of the Enter button will change the display to the Value Mode.
Note: When in Parameter-Selection Mode, pressing the Enter button with parameter
0 selected will cause the unit to return to Running Mode.
Value Mode is used to modify the value of the selected parameter. When in Value Mode, the
two dots which form the colon, between digits two and three, will alternately flash (one, then
the other) to inform the user that a parameter’s value is being edited. Pressing the Up or
Down button increases or decreases the selected parameter’s value. See the default value
tables (below) for the list of preprogrammed values. Value changes take effect immediately.
Once the desired value is showing in the display window, pressing the Enter button again will
return to Parameter Selection Mode. The new value is not saved in permanent memory until
the Enter button is pressed. Removing power from the unit while in Value Mode may result
in the specified new value being lost.
Resetting the Unit to Un-Programmed State
The factory-default settings can be easily restored using either of two methods. Both
methods require the Program Enable jumper to be in the “On” position. The first is to apply
power to the unit with both the Enter and Down buttons pressed for 3 seconds. The second is
to change the value of parameter 95 to 5.
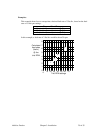
JP1 (Program Enable Jumper)
The JP1 jumper is located under the dust cover on the back end of the upper board. When the
jumper is set to the "Off" position, all programming features are locked out to the front panel
user. When the jumper is in the "On" position, the programming parameters are open to
change. JP1 is shipped in the "Off" position.
Programming Step by Step Guide
1. Remove the power source from the controller. Following the procedures in
your facility, lockout or tagout the power source.
2. Remove the cover from the control enclosure
3. At the connection end of the drive lift the black plastic dust cover up slightly
then slide it out of the back of the drive.
4. Locate the jumper labeled “JP1.”
5. Move the JP1 jumper from the “OFF” position to the “ON” position.
6. Slide the black plastic cover back into position.