


Additive Feeders Chapter 3: Installation 16 of 55
3-3 Electrical Connections
When making electrical connections to your additive feeder, ensure that you take into
consideration and make arrangements for the following:
• A qualified electrician should make all electrical connections.
• Fulfill all national, state, and local safety and electrical code requirements.
• The serial tag lists voltage, phase, and amp draw information
• Line voltage must be within plus or minus ten percent (±10%) of the voltage listed on
the serial tag, or damage may occur.
• Install a fused disconnect with a lockout feature in the power main leading to the
additive feeder if the unit will be wired directly to a power main.
• Make sure all electrical connections are tight.
Main Power Connection
The control is shipped pre-wired and attached to the additive feeder. Standard controls are
supplied with a power cord with the plug wired to the control unit, ready to plug into an
appropriately grounded three-prong receptacle.
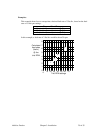
Control Relay Connection
To interlock the additive feeder operation to an injection molding machine, extruder, etc.,
remove jumper (J1) from the terminal block in the control enclosure and wire in the control
relay signal from the processing machine. For injection applications the additive feeder will
automatically operate at the specified rate while the screw is turning.(see 4-3, Injection Mode
Application), for extrusion processes the additive feeder will run proportional to the speed of
the extruder. (See 4-4, Extrusion Mode Application)
Please refer to the schematics enclosed in the information packet for the latest electrical
drawings.