


21S8 Modules
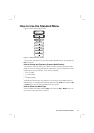
1 Insert the Data Card
• Switch on the S8 Elite II and wait until you see the standby (RAMP)
screen.
• Hold the Data Card with the arrow facing up, and insert it into the slot in
the Data Card module (H-1).
• Push the card in smoothly until it stops moving (H-2) and messages start
appearing on the LCD.
2 Copy Data onto the Data Card
• Data copying starts automatically when the Data Card is inserted into the
Data Card module.
• The “Card Inserted Please Wait” message is displayed on the S8 Elite II
LCD while data is being copied. Copying takes up to 30 seconds.
• The “Copy Complete Remove Card” message is displayed on the LCD
when copying has finished.
• Remove the Data Card from the Data Card module. No additional data is
copied onto the card once the "Copy Complete Remove Card" message is
displayed, even if the card is left in the device. To add additional data to the
Data Card, reinsert the card and repeat these steps.
3 Remove the Data Card
Grip the end of the Data Card and pull it out of the Data Card module (H-3).
4 Store the Data Card
Your Data Card should be stored in its mailback envelope when not in use.
5 Mailing the Data Card to your Clinician
When mailing the Data Card to your clinician:
1. Insert the Data Card into the pocket provided on the mailback envelope. Fold
up the mailback envelope.
2. Place the mailback envelope containing the Data Card in a postal envelope
and seal it.
3. Make sure that your clinician’s name and address details are on the postal
envelope, and mail it back immediately.
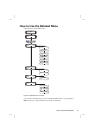
Using the Data Card to Update Settings
If your clinician has provided a Data Card with new device settings:
• With the device in standby (Ramp) mode, insert the Data Card into the slot
on the Data Card module. Updating will start automatically.
• The “Card Inserted Please Wait” message is displayed on the LCD while
updating is in progress. Updating takes up to 30 seconds.
• The “Settings Success Remove Card” message is displayed on the LCD if
the settings were updated successfully.
Note: This message only appears once. If you re-insert the Data Card after you
have updated your settings, this message is not displayed.
• Remove the Data Card from the Data Card module.