


Kids UP Series www.pridemobility.com 25
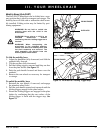
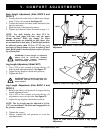
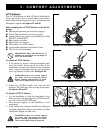
BOLT
GLIDE
BLOCK
CIRCULAR MARK
ON GLIDE BLOCK
V. COMFORT ADJUSTMENTS
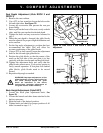
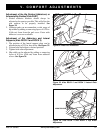
Seat Depth Adjustment (Kids ROCK 2 and
ROCK 3)
1. Remove the seat cushion.
2. Use a 5/32-in. hex wrench to loosen the bolts on the
left and right tubes. See figure 29.
3. Loosen any accessories that prevent the seat pan
from sliding.
4. Push or pull on the front of the seat, evenly on both
sides, until the seat reaches the desired depth.
5. Tighten the bolts and any accessories loosened in
step 3.
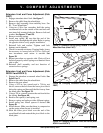
6. When the seat depth is changed, the glide blocks
must be adjusted for proper weight distribution and
active motion.
7. Set the hip angle adjustment to position that best
accommodates the child. This will allow for
accurate positioning of the glide blocks.
8. Using a 5/32-in. hex wrench, loosen the adjustment
bolts on the left and right glide blocks.
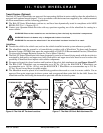
9. Position the glide blocks so that the center of the
notch on the left side of the seat plate is in line
vertically with the circular mark on the glide block.
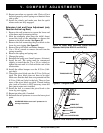
10. Tighten the adjustment bolts and verify that the
glide blocks cannot move. Cycle active motion to
verify smooth operation. If seat plate falls behind
glide blocks, glide blocks need to be moved
inward.
11. Reposition hip angle as needed.
WARNING! Improper adjustment of the
glide block can create a pinch point for
the child. Always adjust the glide
block as indicated in the above
instructions. Improper adjustment of
the glide blocks voids warranty.
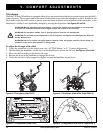
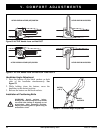
Back Height Adjustment (Kids FAST)
1. Loosen the back plate adjustment knob. See
figure 30.
2. Loosen the laterals and other items attached to the
back as necessary.
3. Slide the back to the desired position.
4. Tighten knob and check for proper position of all
items loosened in steps 1-2.
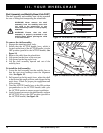
Figure 29. Kids ROCK 2 and ROCK 3 Seat Depth
Adjustment
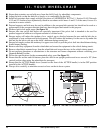
Figure 30. Kids FAST Back Height Adjustment
BACK PLATE
ADJUSTMENT
KNOB
ADJUSTMENT BOLT
SEAT PLATE