


22 www.pridemobility.com Kids UP Series
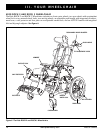
CALF PROTECTOR
FOOT
PLATE
IV. ASSEMBLY
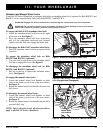
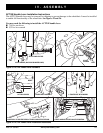
3. Hold the axle and wheel. Align the axle with the
axle sleeve on the wheelchair.
4. Press the button on the axle and slide the axle into
the axle sleeve.
5. Make sure that the axle is fully engaged by
verifying that the button on the top of the axle pops
out. See figure 21.
6. If included, install the hub cap by locating and
rotating to lock into place.
7. Repeat for the rear wheel on the other side.
8. Fold the seatback into position. See III. “Your
Wheelchair.”
9. Install the rear anti-tip wheels. See figure 22.
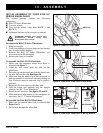
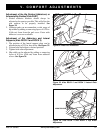
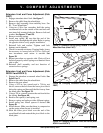
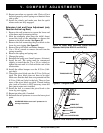
10. Install the calf protector. See figures 23 and 24.
11. Install the ACTIVE handle then verify the
functionality of the ACTIVE mechanism. See
figures 25 and 26.
12. Make additional adjustments to the wheelchair as
necessary. See V. “Comfort Adjustments.”
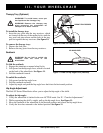
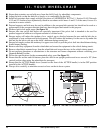
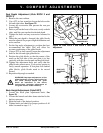
Anti-Tip Wheel Installation (Kids ROCK 2 and
ROCK 3)
Anti-tip wheels are integral and important safety
features of your wheelchair. See figure 22.
PROHIBITED! Do not remove the anti-
tip wheels or modify the wheelchair in
any way that is not authorized by
Pride.
WARNING! The anti-tip wheels should
only be adjusted by a Quantum Rehab
Provider or a qualified technician.
To install and adjust anti-tip wheels:
1. To install, depress the snap button and insert the
anti-tip wheel into the tube.
2. To remove, depress the snap button and remove
the anti-tip wheel from the tube.
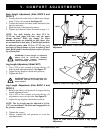
3. For only Kids ROCK 3, obtain the proper
clearance by adjusting the position of the anti-tip
extensions.
NOTE: The anti-tip wheels should be used at all
times. They should be positioned 1.5 in. to 2 in.
(3.81 cm to 5.08 cm) off the ground for proper
function. The anti-tips should extend at least 4 in.
beyond the point where the rear wheel touches the
ground.
Figure 23. Kids UP Series Calf Protector
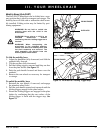
Figure 24. Kids UP Series Calf Protector Installation
CALF PROTECTOR