34 www.pridemobility.com Go-Chair
VIII. CARE AND MAINTENANCE
WARNING! Never use any chemicals to clean a vinyl seat, as they may cause the seat to become
slippery or dry out and crack. Use soapy water and dry the seat thoroughly.
Wheel Replacement
If your chair is equipped with a solid tire insert, then you must
replace the whole wheel assembly. Replacement wheel as-
semblies are readily available through an authorized Pride
Provider.
WARNING! To avoid possible injury, be sure
that the controller’s power is turned off and
the Go-Chair is not in freewheel mode before
performing this procedure.
To replace the wheel:
1. Turn off the power to the controller.
2. Set the Go-Chair up on blocks.
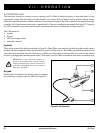
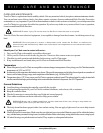
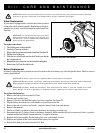
3. Remove the drive wheel nut from the wheel hub. See figure 24.
4. Pull the wheel off the axle.
5. Slide the new wheel back onto the shaft. Make sure that the
key is in the axle slot.
6. Reinstall the drive wheel nut onto the wheel hub and tighten.
7. Remove the Go-Chair from the blocks.
Battery Replacement
A battery wiring diagram is printed on a decal located on the front battery tray. See the Specifications Table for correct
battery specifications.
WARNING! Prevent injury. Do not replace battery when seat is occupied.
WARNING! Battery posts, terminals, and related accessories contain lead and lead compounds.
Wear goggles and gloves when handling batteries and wash hands after handling.
WARNING! Go-Chair batteries are heavy. See specifications table. If you are unable to lift that
much weight, be sure to get help. Lifting beyond your capacity can result in personal injury.
To replace the batteries:
1. Remove the battery box from the Go-Chair.
2. Turn the pack upside down.
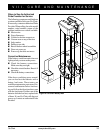
3. Remove all screws that hold the battery box halves together. See figure 25.
4. Flip the battery box back over so the handle is up and remove the lid.
5. Remove the red (+) positive and black (-) negative battery leads from each battery.
6. Remove the batteries.
7. Put the new battery or batteries back into the battery box (battery terminals up).
8. Reconnect the two (2) battery leads to the battery terminals. Make sure the red lead is connected to the (+) positive
terminal and the black lead is connected to the (-) negative terminal.
9. Replace the lid and carefully flip the battery box over so the handle is down.
10. Replace and tighten all the screws that hold the battery box together.
11. Reinstall the battery box back onto the Go-Chair.
Figure 24. Go-Chair Drive Wheel


