


R-4106.A
AOJUSTMENT
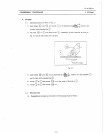
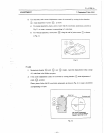
2. Binocular Body
(ER·tub!DI
1)
Unscrew
@.
and
remove
the
binocular body.
Release
screw
@
to
move
lens
chamber
G)
(with
~
and
i§
inside). Attach
the
binocular body
to
the
main
body
again
holding
this with the hand.
·
See
that no derangement
takes
place
(For adjustment, consider
such
a derangement
as
caused
by fastening
(@).
2)
Apply
No.
350 to
screw
@.
3)
Fix
the binocular body
to
the
main
body
Q)
with
screws
(§
x3.
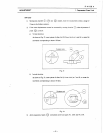
IF-tuoo)
1)
Fasten screw e@ lightly,
and
move
lens
charnber
@)
( with
@:D
and
@ inside
).
Attach the binocular body
to
the main body
again
holding this with
the
hand to
see
that
no
derangement takes place.
2) Lock
@
(@),
applying
No.
350.
3) Fix the binocular body
to
the
main body
(D
with
screws
@ x
3.
(UW-tuool
1)
Place
the straight tube (too!) on
t.he
binocular tube attaching part, pushing the too! tube
sufficiently against
the
main
body.
Make
adjustment
by
moving
@ (with @ and
@ metais inside) within a
range
of
2
scale
lines
in
the Kellner eyepiece.
(If
an
attaching
errar
of
optical
axis
of binocular body
is
found,
make
adjustment
for
@, once again.)
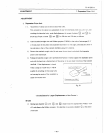
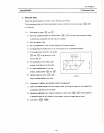
2-5.
Parfocality adjustment
1) After
focusing
in
the standard straight tube, take reading
of
the
dia!
gauge
to
measure the tube
length errar (115
.2
± 1 mm),
using
too! 125148
for
adjusting tube length.
2)
Moving
vertically the
sleeve
cover ring e@
(@),
bring
the
above
mentioned errar within
±0.lmm.
3)
If
in
the above case,
levei
difference
of
paired exit pupils
is
found within 0.5mm between the
right and left ends,
OK.
-46-