


7
This Procedure includes the following:
Installing/Removing the Lateral Supports
Installing/Removing Cushions
Adjusting the Mounting Hardware
PREPARING THE INFINITY BACK FOR INSTALLATION PROCEDURE 2
P
R
E
P
A
R
I
N
G
T
H
E
B
A
C
K
INSTALLING/REMOVING THE
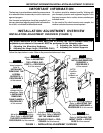
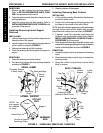
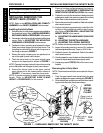
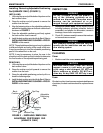
LATERAL SUPPORTS (FIGURE 1)
NOTE: Refer to the INSTALLATION AND STABILITY
WARNINGS in the SAFETY SUMMARY of this manual.
NOTE: The lateral supports include the lateral thoracic sup-
ports and the pelvic stabilizers.
Installing
1. Remove the back cushion from the back panel. Refer
to INSTALLING/REMOVING CUSHIONS in this pro-
cedure of the manual.
2. Hold one (1) mounting screw with the threads UP.
3. Position the tooth lock washer on the mounting screw.
4. Position the curved washer on the mounting screw so
that the bent portion is TOWARD the head of the mount-
ing screw as shown in FIGURE 1.
5. Position the lateral support in the upper, middle or lower
position, aligning the mounting holes of the support with the
adjustment slot in the Infinity Back as shown in FIGURE 1.
NOTE: The grooves next to the mounting holes in the lat-
eral supports are provided to align supports on either side
of the Infinity Back. Look through the toothed adjustment
slot to see which mounting hole has been used and use the
same mounting hole on the opposite lateral support.
6. Loosely install the mounting screw with washers
through the adjustment slot and into the mounting hole
on the lateral support.
NOTE: It is not necessary to tighten the mounting screws
on the lateral supports at this time. The lateral supports will
be adjusted after the Infinity Back has been installed on the
wheelchair and the user has been evaluated.
7. Repeat STEPS 2-6 for the other mounting screw for
this lateral support.
8. Repeat STEPS 2-7 for the remaining lateral supports.
9. Install the back cushion on the back panel. Refer to
INSTALLING/REMOVING CUSHIONS in this pro-
cedure of the manual.
Removing
1. Remove the back cushion from the back panel. Refer
to INSTALLING/REMOVING CUSHIONS in this pro-
cedure of the manual.
2. Remove the (2) mounting screws and washers se-
curing the lateral support to the back panel.
FIGURE 1 - INSTALLING/REMOVING THE
LATERAL SUPPORTS
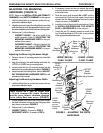
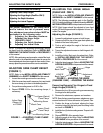
INSTALLING/REMOVING
CUSHIONS (FIGURE 2)
NOTE: Refer to the INSTALLATION AND STABILITY
WARNINGS in the SAFETY SUMMARY of this manual.
CAUTION
The cushion covers are designed to pro-
tect the foam against moisture and to pro-
vide fire retardency. DO NOT use the back
without the covers. If the covers are torn,
they must be replaced immediately.
Installing/Removing Spinal Insert
INSTALLING.
1. Remove the back cushion from the back panel(s).
Refer to INSTALLING/REMOVING BACK CUSH-
ION in this procedure of the manual.
2. Align the hook and loop fasteners on the spinal insert(s)
and back panel(s).
3. Press the rounded edge of the spinal insert(s) onto the
rounded groove in the back panel(s) to secure.
4. Install the cushion onto the back panel(s). Refer to IN-
STALLING/REMOVING BACK CUSHION in this
procedure of the manual.
Lateral Thoracic Support
Pelvic Stabilizer
Mounting
Screw
Tooth Lock Washer
Curved Washer
Toothed Adjustment
Slot
Back
Panel
Back Panel
Grooves
Grooves
3. Remove the lateral support.
4. Repeat STEPS 2-3 for the remaining lateral supports,
if necessary.
5. Install the back cushion on the back panel. Refer to
INSTALLING/REMOVING CUSHIONS in this pro-
cedure of the manual.