


February 2015
14
Quick Start Guide
Step 6: Trim the transmitter
Devices are calibrated by the factory. Once installed, it is recommended to
perform a zero trim on gage and differential pressure transmitters to eliminate
error due to mounting position or static pressure effects. A zero trim can be
performed using either a Field Communicator or configuration buttons.
For instructions using AMS, please see the Rosemount 3051 HART 7 Product
Manual (00809-0100-4007).
Note
When performing a zero trim, ensure that the equalization valve is open and all wet legs
are filled to the correct level.
1. Choose your trim procedure.
a. Analog Zero Trim – Sets the analog output to 4 mA.
Also referred to as a “rerange,” it sets the Lower Range Value (LRV) equal
to the measured pressure.
The display and digital HART output remains unchanged.
b. Digital Zero Trim – Recalibrates the sensor zero.
The LRV is unaffected. The pressure value will be zero (on display and
HART output). 4 mA point may not be at zero.
This requires that the factory calibrated zero pressure is within a range of
3% of the URL [0 + 3% ϫ URL].
Example
URV = 250 inH
2
O
Applied Zero Pressure = + 0.03 ϫ 250 inH
2
O = + 7.5 inH
2
O (compared to
factory settings) values outside this range will be rejected by the transmitter.
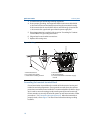
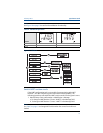
Trimming with a Field Communicator
1. Connect the Field Communicator, see “Connect the wiring and power up” on
page 9 for instructions.
2. Follow the HART menu to perform the desired zero trim.
It is not recommended to zero an absolute transmitter, models 3051CA or 3051TA.
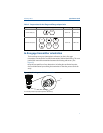
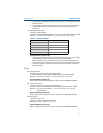
Table 5. Zero Trim Fast Keys
Analog zero (set 4 mA) Digital zero
Fast Key Sequence 3, 4, 2 3, 4, 1, 3