


10
Introduction
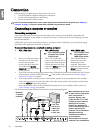
English
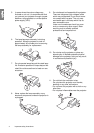
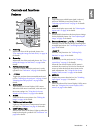
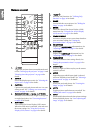
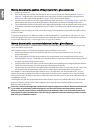
Remote control
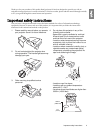
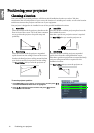
1. Power
Toggles the projector between standby mode and
on. See "Starting up the projector" on page 23 and
"Shutting down the projector" on page 40 for
details.
2. ASPECT
Selects the display aspect ratio. See "Selecting the
aspect ratio" on page 30 for details.
3. CAPTURE
Captures the projected picture and save it as your
startup screen. See "Creating your own startup
screen" on page 38 for details.
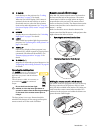
4. Keystone/Arrow keys ( / Up, / Down)
Manually corrects distorted images resulting from
an angled projection. See "Correcting keystone"
on page 29 for details.
5. MENU/EXIT
Turns on the On-Screen Display (OSD) menu.
When the OSD menu is activated, exits and saves
the menu settings. See "Using the On-Screen
Display (OSD) menus" on page 24 for details.
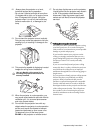
6. Left/
Starts the FAQ function. See "Utilizing FAQ
function" on page 36 for details.
7. BLANK
Used to hide the screen picture. See "Hiding the
image" on page 36 for details.
8. ENTER
Enacts the selected On-Screen Display (OSD)
menu item. See "Using the On-Screen Display
(OSD) menus" on page 24 for details.
9. TIMER ON/SHOW
Activates or displays an on-screen timer based on
your own timer setting. See "Setting the
presentation timer" on page 34 for details.
10. BRIGHTNESS
Displays the BRIGHTNESS adjustment bar. See
"Adjusting Brightness" on page 32 for details.
11. CONTRAST
Displays the CONTRAST adjustment bar. See
"Adjusting Contrast" on page 32 for details.
12. TIMER SETUP
Enters presentation timer setting directly. See
"Setting the presentation timer" on page 34 for
details.
13. Indicator light
Flashes or lights red when any key on the remote
control is pressed.
14. MODE
Depending upon which input signal is selected,
selects an available picture mode. See "Selecting a
picture mode" on page 31 for details.
15. FREEZE
Freezes the projected picture. See "Freezing the
image" on page 36 for details.
16. MUTE
Toggles projector audio between on and off. See
"Muting the sound" on page 38 for details.
17. AUTO
Automatically determines the best picture timings
for the displayed picture. See "Auto-adjusting the
image" on page 28 for details.
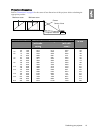
1
2
3
4
5
6
7
8
9
10
11
12
13
14
15
16
17
18
19
4
20
21
22
I
I