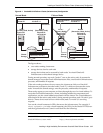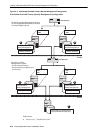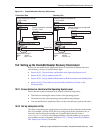
Installing OCA and OracleAS Metadata Repository Only
4-22 Oracle Application Server Installation Guide
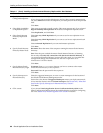
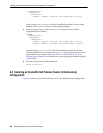
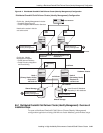
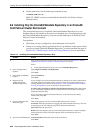
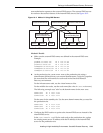
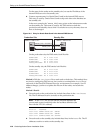
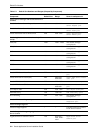
Table 4–11 Steps for Installing OCA and OracleAS Metadata Repository
Screen Action
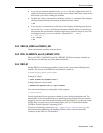
1. -- Start up the installer and complete the first few screens. See Section 4.27, "Install
Fragment: The First Few Screens of the Installation" for details.
Notes:
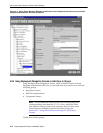
■ In the Select Installation Type screen, select Identity Management and
OracleAS Metadata Repository.
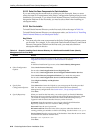
2. Select Configuration
Options
Do not select Oracle Internet Directory because you want to use an existing one.
Do not select Oracle Application Server Single Sign-On.
Do not select Oracle Application Server Delegated Administration Services.
Do not select Oracle Directory Integration Platform.
Select Oracle Application Server Certificate Authority (OCA).
Do not select High Availability and Replication.
Click Next.
3. Specify Port
Configuration Options
If you want to use default ports for the components, select Automatic.
If you do not want to use the default ports, and you have created a staticports.ini
file, select Manual and enter the fullpath to your staticports.ini file.
Click Next.
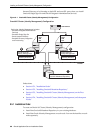
4. Register with Oracle
Internet Directory
Hostname: Enter the name of the computer where Oracle Internet Directory is
running.
SSL Port: Enter the SSL port at which Oracle Internet Directory is listening. See
Section 4.17, "How to Determine Port Numbers Used by Components" if you do
not know the port number.
Click Next.
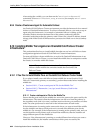
5. Specify Oracle Internet
Directory Login
Username: Enter the username to log in to Oracle Internet Directory. You must log
in as a user who belongs to the Trusted Application Admins group and to the iAS
Admins group in Oracle Internet Directory.
Password: Enter the password for the username.
Realm: Enter the realm against which to validate the username. This field appears
only if your Oracle Internet Directory has multiple realms.
Click Next.
6. OCA screens Enter information to configure OCA. See Section 4.30, "Install Fragment: OCA
Screens".
7. Oracle Database screens Enter information for the OracleAS Metadata Repository database. See
Section 4.29, "Install Fragment: Database Screens".
8. Specify Instance Name
and ias_admin Password
Instance Name: Enter a name for this infrastructure instance. Instance names can
contain alphanumeric characters and the _ (underscore) character. If you have
more than one Oracle Application Server instance on a computer, the instance
names must be unique. See Section 3.5, "Oracle Application Server Instances and
Instance Names" for instance name details.
Example: infra_oca
ias_admin Password and Confirm Password: Set the password for the ias_admin
user. This is the administrative user for the instance. See Section 3.6, "The ias_
admin User and Restrictions on its Password" for restrictions on the password.
Example: welcome99
Click Next.
9. -- Finish the installation. See Section 4.28, "Install Fragment: The Last Few Screens of
the Installation" for details.