


12
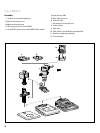
Assembly
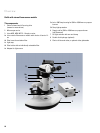
Lamp housing
The Leica 106Z lamp housing is equipped.
For information about the supply units for the 106Z lamp
housing, see page 14.
Model 105Z lamp housings, if available, can also be used.
Observe the safety regulations on page 5
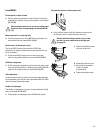
Notes and recommendations
• Donotswitchonandoffmorethannecessary,because
this will shorten the burner life
• Hotmercury-vapourburnerscannotbeignitedagainuntil
after they have cooled
• Ifpossible,burn-innewmercury-vapourburnersbyrunning
them con tinuously for one or two hours
• Beverycarefulwhenfittingtheburner.
Do not apply pressure, as it breaks easily
• Nevertouchtheglassenvelopeoftheburnerwithyourfin-
gers. Fingerprints later burn in and reduce the light quality.
If necessary, carefully remove fingerprints and dust using a
cloth damped with alcohol and then wipe dry.
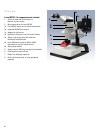
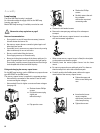
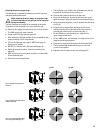
Fitting and changing the mercury-vapour burner
For the l06Z lamp housing, use the 100W mercury-vapour burner
type 307-072.057 or the 50W burner.
The mercury-vapour burner is supplied in a separate package.
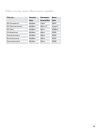
– Units which are unmarked or are marked L1 are for lower
currents and higher voltages.
– Units marked L2 are for higher currents and lower voltages
(see page 14).
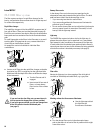
▶ Slacken the two Phillips
screws
▶ Pull the disconnect plug
slightly out
without turning it
▶ Flip open the cover
▶ Slacken the Phillips
screws
▶ Carefully extract the sok-
ket, complete
with burner mount and
connecting cable
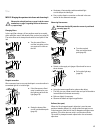
▶ Slacken the slit-headed screws
▶ Remove the transport peg and keep it for subsequent
transport
▶ Dispose of old mercury-vapour burners in accordance
with environmental regulations.
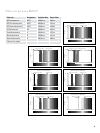
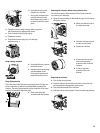
• Whenanewmercury-vapourburnerisfitted,theinscription
on the metal mount must be upright.
▶ Carefully insert the mercury-vapour burner into the lower
mount
▶ For mercury-vapour burners with seal point: Turn these so
that the seal point is at the side of the beam path
▶ Carefully position the flexible power cable on the upper
metal mount of the mercury-vapour burner.
▶ Tighten the upper and
lower screws with great
care
▶ Introduce the burner
mount, complete
with burner, into the rail
of the lamp housing.
▶ Tighten the screws