


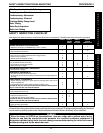

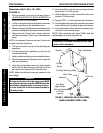

19
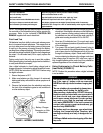
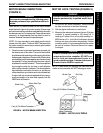
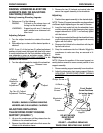
Wheelchair
Frame
Socket
Screws
H-Block
Phillips Screw
Front Socket
Screw Positions
(in inches deep):
18 17 16
Telescoping
Front Rigging
Support
DO NOT USE WITH
FRONT SOCKET
SCREW
Locknuts
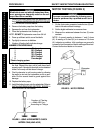
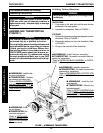
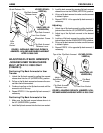
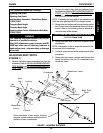
RAISING/LOWERING ELEVATING
LEGRESTS AND/OR ADJUSTING
CALFPADS (FIGURE 6)
Raising/Lowering Elevating Legrests
1. Perform one (1) of the following:
RAISING - Pull back on the release lever until
the leg is at the desired height.
LOWERING - Support leg with one (1) hand and
push release lever downward with
other hand.
Adjusting Calfpads
1. Turn the calfpad towards the outside of the wheel-
chair.
2. Slide calfpad up or down until the desired position is
obtained.
NOTE: If one (1) of the top two (2) calfpad adjustment
positions is being used, the legrest will need to be raised
to avoid interference with the front stabilizers while going
over obstacles or going up and down ramps. Refer to
RAISING/LOWERING ELEVATING LEGRESTS in this
procedure of the manual.
3. Turn the calfpad towards the inside of the wheelchair.
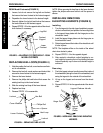
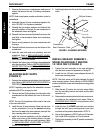
3. Remove the two (2) locknuts and socket bolts that
secure the support assembly to the wheelchair.
Adjusting
1. Position the support assembly to the desired depth.
NOTE: The two (2) support assemblies may be positioned
at different depths depending on the need of the user.
2. Insert the front socket bolt into the wheelchair frame
and the mounting hole in the telescoping front rigging
support determined in STEP 1 and securely tighten
with the locknut.
3. Insert the rear socket bolt through the wheelchair frame
and the telescoping front rigging support and securely
tighten with the locknut.
4. Resecure the H-block to the wheelchair with the phil-
lips bolt and locknut.
5. Snap the crossbraces into the H-blocks. Wiggle the
crossbraces to make sure they are secured in H-
blocks.
Replacing
NOTE: Observe the position of the current support as-
sembly before removal to ensure correct position of new
support assembly.
1. Remove existing support assembly from wheelchair.
2. Adjust the telescoping front rigging support. Refer to
ADJUSTING TELESCOPING FRONT RIGGING
SUPPORT in this procedure of the manual.
Release Lever
Calfpad
Calfpad
Rotated for
Height
Adjustment
FIGURE 6- RAISING/LOWERING ELEVATING
LEGRESTS AND/OR ADJUSTING CALFPADS
Top Two (2) Calfpad
Adjustment Positions
FIGURE 7 - ADJUSTING/REPLACING
TELESCOPING FRONT RIGGING SUPPORT
ADJUSTING/REPLACING
TELESCOPING FRONT RIGGING
SUPPORT (FIGURE 7)
1. Lift up on the crossbraces until they release from the
H-blocks on the wheelchair frame.
2. Remove the phillips bolt and locknut that secure the
H-block to the wheelchair frame.
F
R
O
N
T
R
I
G
G
I
N
G
S
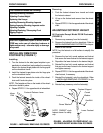
PROCEDURE 4FRONT RIGGINGS