


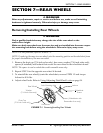

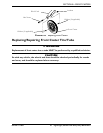


SECTION 9—ANTI-TIPPERS/WHEEL LOCKS
Lightweight, Standard and Heavy Duty Wheelchairs 54 Part No. 1114811
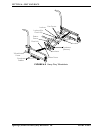
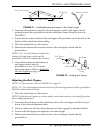
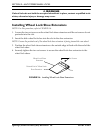
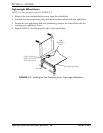
6. If the distance between the bottom of anti-tipper wheels and the ground/floor is not
1½ to 2-inches, repeat STEPS 2-5 until the distance is 1½ to 2-inches.
7. If the 1½ to 2-inch distance cannot be achieved with the anti-tippers, a different model
may be required. Contact an Invacare dealer or qualified technician.
FIGURE 9.3 Adjusting the Anti-Tippers
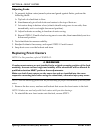
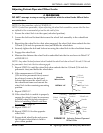
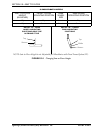
Using/Adjusting Disk Wheel Locks
Using Patient Operated Disk Wheel Locks
ƽ WARNING
DO NOT attempt to stop a moving wheelchair with wheel locks. Wheel locks are
not brakes.
NOTE: For this procedure, refer to FIGURE 9.4.
NOTE: Position wheelchair on a flat, level surface to perform this procedure.
1. Ensure the wheelchair is not moving before engaging the wheel locks.
2. Perform one of the following:
• Push-to-Lock - To engage, push the wheel lock handle forward.
• Pull-to-Lock - To engage, pull the wheel lock handle backward.
3. Disengage the wheel locks by reversing STEP 2.
FIGURE 9.4 Using Patient Operated Disk Wheel Locks
Release Buttons
1½ to 2-inch Clearance
Wheel
Lock
Wheel
Lock
Push-To-Lock Pull-To-Lock
Unlocked
Position
Unlocked
Position
Locked
Position
Locked
Position
Wheel
Lock