


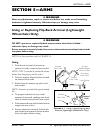


SECTION 6—SEAT AND BACK
Lightweight, Standard and Heavy Duty Wheelchairs 44 Part No. 1114811
Standard Wheelchair with Fixed Frame
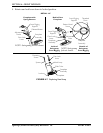
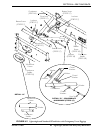
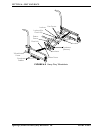
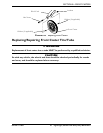
NOTE: For this procedure, refer to FIGURE 6.6.
Removing Lower Mounting Hardware
1. Remove the existing back and seat upholstery from the wheelchair. Refer to Replacing
Back Upholstery on page 41 and Replacing Seat Upholstery on page 41.
NOTE: If adjusting the seat width of the wheelchair, back and seat upholstery as well as the
crossbraces MUST be replaced.
2. Remove the four screws and locknuts that secure the insert tube to the lower
wheelchair frame (Detail “A”).
3. Remove the inserts from the rear of the wheelchair.
4. Remove the hex screw and locknut that secure the two existing crossbraces together.
Removing Upper Mounting Hardware
1. While pushing down on the rear seat guide, pull up the front seat guide until the front
seat guide releases from the wheelchair frame (Detail “B”).
2. Pull the crossbrace away from the rear seat guide.
3. Repeat STEPS 1-2 for opposite crossbrace.
4. Reverse STEPS 1-3 to assemble the upper mounting hardware.
5. Reverse STEPS 1-4 in Removing Lower Mounting Hardware
on page 44.
FIGURE 6.6 Standard Wheelchair with Fixed Frame
Heavy Duty Wheelchairs
NOTE: For this procedure, refer to FIGURE 6.7 and FIGURE 6.8 on page 46.
NOTE: When adjusting the seat width of the wheelchair, the back and seat upholstery MUST be
changed. If applicable, the headrest pillow and headrest upholstery MUST be changed as well.
DETAIL “B” -
REMOVING UPPER
MOUNTING
HARDWARE
DETAIL “A” - REMOVING LOWER
MOUNTING HARDWARE
Rear Seat Guide
Crossbrace
Front Seat Guide
Crossbrace
Insert Tube
Wheelchair
Frame
Locknut
Screw
Hex Screw