


Parts –
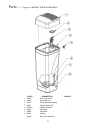
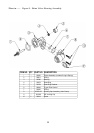
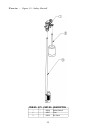
Drive End Cap Assembly
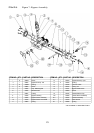
93583 Drive End Cap:
Seals the two openings on the Main Valve Body. The larger diameter
opening is sealed with an 0-ring used as an axial or "face" seal. The 0-ring sits in a groove in the
End Cap. This groove must be free of defects such as pits or scratches and also free of debris.
The smaller diameter seal is accomplished with an 0-ring used as a radial seal. The 0-ring should
be placed on the male boss on the End Cap. When assembling the End Cap to the Valve Body,
care should be taken to make sure the small 0-ring is aligned with the opening in the Valve Body
and that the large 0-ring stays in the groove in the End Cap. If misaligned, the 0-rings can
become pinched and leak.
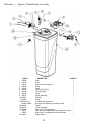
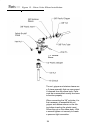
90217 Drive Motor:
The Motor is held in place by two
1
/2
"
screws. The screws should be "snug".
The brass pinion gear on the Motor should engage the plastic Drive Gear. The wires should be
securely fastened to the Controller.
93216 Piston Slide:
The Slide should move freely inside the End Cap Housing. The stainless
steel threaded stud should be pointing toward the Valve Body.
93217 Piston Slide Cam:
This is the "heart" of the drive system. There is a threaded stainless
steel shaft that runs through the main drive axle. The Drive Gear is attached at the short end and
the Magnet Disc at the other end. The Slide Cam is assembled inside of the Piston Slide (93216).
This Cam Shaft should turn freely before the Motor is assembled.
93219 Piston Slide Cam Cover:
The cover secures the Piston Slide Cam (93217) in place and
acts as a bushing for the Cam Shaft.
93238 Drive Gear:
The Olive gear is assembled to the Slide Cam by means of a "keyed" opening
which transfers the "torque" generated by the Motor to the rest of the drive system. If the drive
system becomes jammed, this opening can become "rounded" causing the gear to turn, but not the
Piston Slide Cam. If this occurs, clear the jam and replace the Drive Gear and Piston Slide Cam
(93217).
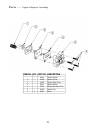
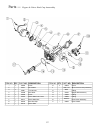
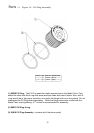
93601-JG Brine Valve Assembly:
Attaches to the Drive End Cap with two
3
/" thread cutting
screws and has one 0-ring seal. When assembling, the 0-ring should be placed on the Drive End
Cap boss and be lubricated with silicone grease. A twisting action should be applied along with
pressure until the 0-ring seats.
28