


(I-0320--.doc/6)
6
III MULTIPORT INSTALLATION
Before installing the unit, observe all warning tags and:
1. Check for external physical damage.
2. Check for any visible leakage of gear oil from the speed reducer (426).
3. Visually inspect the inside of the multiport through the group outlet port checking for damage,
rust, and debris.
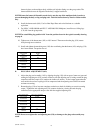
4. Check the wiring arrangement using the attached diagram on page 17 or as supplied for a
particular order/unit.
5. Verify the voltage requirement of the motor (AC/DC) and connect power supply and signal
circuits to test the operation of the motor (438) and plug. Check for proper plug seal alignment at
each port.
NOTE: The Multiport Flow Selector plug seal/port alignment is factory adjusted when supplied with
actuator and should not require further adjustment.
6. Connect piping.
NOTE: When hydrotesting external piping, position the plug between any two inlet ports in order to
equalize test pressure between the multiport body and external piping and prevent possible seal
damage from occurring.
IIIB
FIELD TECHNICIAN COMMISSIONING ACTIVITIES
Refer to the Multiport Electronic Controller service manual I-0168 for detailed commissioning activities.
CAUTION:
The valve body may be pressurized from hydrostatic testing - do not remove any bolts or flanges for
inspection until after the unit has been depressurized.
The connector and pointer are potential pinch points for fingers when the unit is rotating - keep
hands clear of the unit during operation.
Circuit boards are susceptible to damage from static discharge when touched - ensure that you
ground yourself before touching the JOG, ZERO, and HOME buttons on the electronic controller
board.
NOTE: Locate the reference mark (a centre punch mark) on the flat section of the stem to indicate
the orientation of the plug seal. The mark should be visible between the flats of the lower section of
the connector when assembly is completed and is to be used as a reference indicating the plug seal
location in the body (See photo, page 22).
A. REINSTALLATION OF THE ACTUATOR ASSEMBLY (also refer to section VII)
NOTE: The indicator plate (402) must be set in place as the motor/gearbox is lowered onto the valve
body.
1. Using a manual wrench, rotate the plug assembly two or three revolutions to verify that it turns
freely. Initial effort required to turn the plug may be high as the seal will typically acquire some
set from sitting for extended periods of time. Turn the plug until the reference mark is aligned