


Operation 3 - 9
pressurized for regeneration. (When the off-line
chamber is pressurized, the Purge Pressure Indica-
tor will read “system pressure”.)
13. The Normal Start-Up or Restart procedure for mod-
els LS2070 through LS2580 is now complete. Pro-
ceed to the Normal Operational Checks section of
this manual for final operational checks and adjust-
ments.
3.7 Normal Operational Checks
1. Ensure that the dryer is being operated at the correct
inlet pressure, flow rate, and inlet temperature, as
specified on the Dryer Specification Label (located on
inside cover of dryer system control enclosure).
2. If the prefilter utilizes any automatic drain device, en-
sure that it is draining and functioning properly.
3. Ensure that the Purge Pressure Indicator (gauge) in-
dicates the pressure setting calculated during start-
up.
4. After an off-stream desiccant chamber has depressur-
ized for regeneration, a flow of purge gas should be
felt exiting the purge exhaust muffler. The regenerat-
ing chamber’s pressure gauge MUST indicate zero (0)
PSIG throughout the purging period.
5a. The dryer controller should automatically switch the
system from left to right and right to left chamber dry-
ing on a fixed time cycle. If the system fails to
switch drying chambers twice within its designated
NEMA Cycle, refer to the TROUBLESHOOTING
GUIDE.
5b. If a Hydrobloc Compu-Save Energy Management
System Control indicates a High Humidity Warning
upon start-up, it should automatically shift to EN-
ERGY MANAGEMENT ACTIVE within twenty-four
(24) hours of start-up. If system fails to shift to EN-
ERGY MANAGEMENT ACTIVE within this time pe-
riod, refer to the TROUBLESHOOTING GUIDE and
conduct checks listed for HIGH HUMIDITY WARN-
ING (See following Note.)
Note: The system will operate in a fixed cycle ac-
companied by a HIGH HUMIDITY WARNING until the
desiccant beds have been regenerated to the extent
necessary to provide a process gas supply at the
dryer’s rated dew point. The control system will then
automatically shift to ENERGY MANAGEMENT AC-
TIVE. During normal dryer operation (ENERGY MAN-
AGEMENT ACTIVE), the off-stream desiccant cham-
ber will depressurize and begin regenerating (purging)
ONLY when the need for a regeneration cycle is
sensed by the chamber’s Compu-Save Humidity
Sensor. Otherwise, the off-stream chamber will re-
main pressurized.
6. If the dryer has a Moisture Indicator and the
Indicator’s granular indicating gel is pink at the time of
dryer start-up, a color change to blue should be noted
within twenty-four (24) hours. Ensure that the
indicator’s bleed valve has been adjusted as in-
structed in the start-up procedure.
7. Ensure that the System Inlet and Outlet Isolation
Valves (customer supplied) have been fully opened.
8. Ensure that the dryer control system’s enclosure
cover is closed with all latches tightened to prevent
entrance of moisture, dust, dirt, etc.
9. SHUTDOWN AND DEPRESSURIZE DRYER follow-
ing two (2) to three (3) weeks of initial operation. In-
spect desiccant beds through fill ports, for settling. If
settling has occurred, refill chambers as necessary to
bring desiccant levels to bottom of each desiccant
retaining screen. Do Not Tamp or Ram Desiccant.
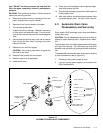
3.8 Dryer Shutdown
1. De-energize the dryer’s electrical supply. When the
dryer’s power supply is de-energized, both desiccant
chambers will be automatically placed on-stream.
2. Close the System Outlet Isolation Valve (customer
supplied).
3. Close the System Inlet Isolation Valve (customer sup-
plied).
IMPORTANT: Inlet and Outlet Isolation Valves
MUST be closed to prevent moisture overloading of
desiccant beds, due to continuous flow without regen-
eration.
4. Close the Moisture Indicator Supply Valve (if dryer has
been so-equipped). This MUST be done to prevent
depressurization of the pilot gas supply, which in turn,
will eventually result in dryer depressurization.
5. Shutdown is now complete. The dryer may be left
pressurized during periods of non-use, if desired.
However, if any servicing or maintenance is to be per-
formed, ensure that the dryer is depressurized BE-
FORE beginning work. Proceed to Step 6 for depres-
surization instructions.
WARNING!
Ensure that the system is de-energized, valve
isolated, and fully depressurized before attempt-
ing to remove or disassemble any component or
subassembly. Failure to do so may result in se-
rious personal injury and/or equipment damage.
6. To depressurize dryer, proceed as follows:
a) Open customer-supplied System Bypass Valve
(if gas system has been so-equipped).