


- Eng 12 -
Deutsch
English
Español Português Italiano
Français
- Eng 13 -
English
EspañolPortuguêsDeutsch
Français
Italiano
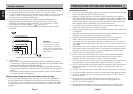
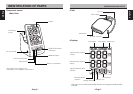
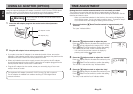
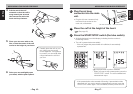
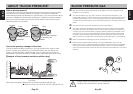
USING AC ADAPTER (OPTION)
2 Plug the AC adapter into a mains power outlet.
1 Insert the AC adapter plug into the socket on the blood pressure
monitor.
Using the optional dedicated AC adapter (model:AC-230CZ) for the CITIZEN blood
pressure monitor (CH-456) allows you to measure your blood pressure without
having to worry about the amount of remaining charge in the batteries.)
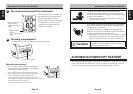
Warning
The CH-456 and AC-230CZ should be used indoors
in dry location.
• If you plan to use the AC adapter for an extended period of time, remove the
batteries. If the batteries are left in the compartment, electrolyte may leak from the
batteries and cause a fault in the blood pressure monitor.
• When only batteries are used to supply power to the monitor, the AC adapter
should be unplugged from the monitor. Leaving the AC adapter plugged into the
blood pressure monitor could cause a malfunction.
• Plug the AC adaptor into the socket, where you can easily plug off soon and
safely in times of trouble.
The dedicated AC adapter (model:AC-230CZ) for the CH-456 is optional.
The AC adapter is available from retailers stocking CITIZEN digital blood
pressure monitors.
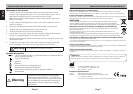
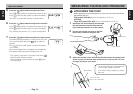
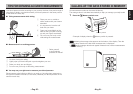
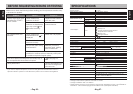
TIME ADJUSTMENT
Setting the clock enables measurements to be accurately recorded.
The monitor can record the date and time of measurement as well as the
measurement results. Be sure to set the clock after inserting the batteries. Set the
date fi rst and then the time.
1 Press and hold the Date/Time Set switch for approximately two
seconds.
The “year” indicator blinks.
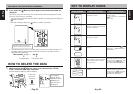
2 Press the Adjust switch to adjust the year.
Press
Adjust switch to increase the number by one.
(The year can be adjusted in the range of 2011-2040.)
Press
Date/Time Set switch to confi rm the setting.
The “year” is set and the “month” indicator blinks.
3 Press the Adjust switch to adjust the “month”.
Press Adjust switch to increase the number by one.
Press
Date/Time Set switch to confi rm the setting.
The “month” is set and the “day” indicator blinks.
4 Press the Adjust switch to adjust the “day”.
Press Adjust switch to increase the number by one.
Press
Date/Time Set switch to confi rm the setting.
The “day” is set and the “hour” indicator blinks.
* You can fast-forward the numbers in display by
pressing and holding
Adjust switch.
* When you install the batteries for the fi rst time, the monitor will display the
clock setting screen. You do not need to perform step 1. Proceed to step 2.
If you set the clock and change its setting, start from step 1.
AC adapter socket
AC adapter plug