


Aruba Mobility Controller Configuration Guide
VIEW Certified
Page 6
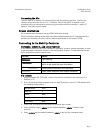
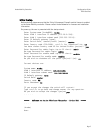
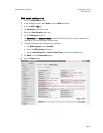
Assigning an IP to the Mobility Controller
1. Connect to the switch via the CLI.
2. Login with the configured username and password, admin /admin in this example.
3. Type enable at the
> prompt.
4. Type the enable password, enable in this example.
5. Type configure terminal at the # prompt.
6. Create the vlan for the voice (vlan 25) using the vlan command:
(Aruba) (config) #vlan 25
7. Create the vlan interface.
(Aruba) (config) #interface vlan 25
8. Assign the IP address to the interface.
(Aruba) (config-subif)#ip address 10.168.10.2 255.255.255.0
9. Create the loopback interface and assign an IP address to the loopback. For more
information about the loopback interface refer to the user guide.
(Aruba) (config) #interface loopback
(Aruba) (config-loop)#ip address 10.168.10.1
Switch IP Address is Modified. Switch should be rebooted now
(Aruba) (config-loop)#!
(Aruba) (config) #ip default-gateway 10.168.10.10
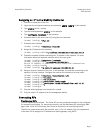
10. Assign a physical interface to the vlan. In this example, the interface connecting to the
network is a trunk interface. Configure the mode on the interface to a trunk mode.
(Aruba) (config) #interface fastethernet 1/0
(Aruba) (config-if)#trusted
(Aruba) (config-if)#no shutdown
(Aruba) (config-if)#switchport mode trunk
(Aruba) (config-if)#switchport trunk allowed vlan add 10,25
(Aruba) (config-if)#!
(Aruba) (config)#
11. Ping the default gateway from the switch’s console.
12. Ping the switch’s IP address from the management station.
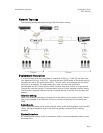
Connecting APs
Provisioning APs
The APs need to be provisioned. The Aruba APs can be provisioned manually or be configured
for automatic provisioning. For manual provisioning, use the Web-based AP provisioning Web
page. Refer to the AP Provisioning User Guide for instructions on provisioning the AP.
The APs can communicate with the controller over a L2 or L3 network. The only requirement
is that each AP be assigned an IP address and default gateway using DHCP.