


48 www.pridemobility.com Jazzy 1101/1121/Rev E/Jun03
IX. CARE AND MAINTENANCE
n Use a rubber conditioner on the tire sidewalls to help preserve them.
WARNING! Never use a rubber conditioner on the tread area of the tires; doing so may make the
tires slippery and cause your Jazzy to skid.
n The body shroud has been sprayed with a clear sealant coating. You can apply a light coat of car wax to help it retain
its high-gloss appearance.
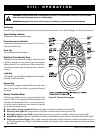
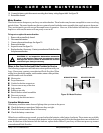
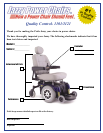
n Check all electrical connections. Make sure they are tight and are not corroded. Batteries must sit flat within the battery
well, with the battery terminals facing inward, toward each other. Refer to the frame decal for the correct wiring layout.
See figure 28.
n All wheel bearings are prelubricated and sealed. They require no subsequent lubrication.
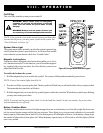
Daily Checks
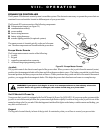
n With the controller turned off, check the joystick. Make sure it is not bent or damaged and that it returns to the neutral
position when you release it. Check the rubber boot around the base of the joystick for damage. Visually inspect the
boot. Do not handle or try to repair it. See your authorized Pride Provider if there is a problem.
n Visually inspect the controller harness. Make sure that it is not frayed, cut, or has any wires exposed. See your
authorized Pride Provider if there is a problem with any harnesses.
Weekly Checks
n Disconnect and inspect the controller from the electronics tray. Look for corrosion. Contact your authorized Pride
Provider if necessary.
n Ensure that all parts of the controller system are securely fastened to your power chair. Do not overtighten any screws.
n Check for proper tire inflation. There should be 30 35 psi in each tire. If a tire does not hold air, see an authorized
Pride Provider for replacement of the tube.
n Calibrate the joystick if a noticeable difference in performance is detected or if the joystick does not operate properly.
To calibrate the joystick, power off the unit, place the joystick in the neutral position, and power the unit back on. If
a problem still exists with your joysticks performance, contact your authorized Pride Provider.
n Check the brakes. This test should be carried out on a level surface with at least three feet of clearance around your
power chair.
To check the brakes:
1. Turn on the controller and turn down the speed level of your power chair.
2. After one second, check the battery condition meter. Make sure that it remains on.
3. Slowly push the joystick forward until you hear the electric brakes click. Immediately release the joystick. You must be
able to hear each electrical brake operating within a few seconds of joystick movement. Repeat this test three times,
pushing the joystick backwards, then left, and then right.
To calibrate the joystick (Remote Plus only):
1. Position the joystick in the full reverse position and hold it there. Turn on the controller.
2. The battery condition meter lights up from one light to ten lights, and then back to one light. It does this twice, then
blinks rapidly.
3. Turn off the controller.
4. Position the joystick in the full forward position and hold it there; then turn the controller on.
5. The battery condition meter lights up from one light to ten lights, and then back to one light. It does this twice, then
blinks once, and then it blinks continuously.
6. Turn off the controller. Now the joystick and controller are set up to function properly together.