


32
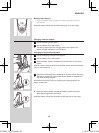
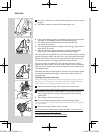
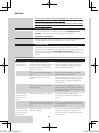
4 Turn the lock anticlockwise (A) and remove the retaining frame (B).
5 Remove and clean one shaving head at a time. Each shaving head
consists of a cutter and a guard.
Note: Do not clean more than one cutter and guard at a time, since they are
all matching sets. If you accidentally mix up the cutters and guards, it may take
several weeks before optimal shaving performance is restored.
Remove the cutter from the shaving guard and clean it with the brush. -
- Clean the inside and outside of the shaving guard with the brush.
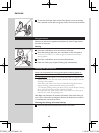
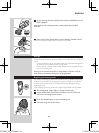
6 Put the shaving heads back into the shaving unit.
Note: Make sure that the projections of the shaving heads fi t exactly into the
recesses.
7 Put the retaining frame back into the shaving unit and turn the lock
clockwise.
8 Insert the lug of the shaving unit into the slot in the top of the shaver.
Then close the shaving unit.
Note: If the shaving unit does not close smoothly, check if you have inserted
the shaving heads properly and if the retaining frame is locked.
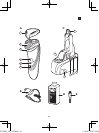
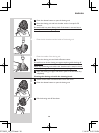
Cleaning the shaving unit in the Jet Clean System
The Jet Clean System cleans the shaving unit.
A
B
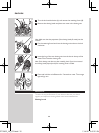
Preparing the Jet Clean System for use
Note: Fill the cleaning chamber before fi rst use and when the ‘fl uid low’ symbol
fl ashes to indicate that the fl uid level is too low. When the fl uid level drops
below the minimum level, the cleaning symbol and the ‘fl uid low’ symbol start
to fl ash and the shaver holder returns to its starting position
1 Simultaneously press the release buttons on both sides of the
cleaning chamber (A). Then lift the Jet Clean System off the cleaning
chamber (B).
The cleaning chamber remains behind. ,
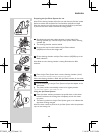
2 Unscrew the cap from the bottle with Jet Clean solution
(HQ200) and remove the airtight seal.
3 Fill the cleaning chamber with Jet Clean solution (HQ200) up to the
MAX indication.
Note: Make sure the cleaning chamber is always fi lled above the MIN
indication.
4 Place the Jet Clean System back onto the cleaning chamber (‘click’).
Make sure that the release buttons snap back into place.
When the cleaning chamber is fi lled with Jet Clean solution, do not move
it to prevent leakage.
5 Put the small plug in the Jet Clean System and put the adapter in the
wall socket.
The shaver holder automatically moves to its highest position. ,
The Jet Clean System is now ready for use.
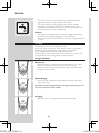
Using the Jet Clean System
1 Place the shaver without protection cap upside down in the shaver
holder. Push down the locking lever completely to lock the shaver
into place.
The battery symbol on the Jet Clean System goes on to indicate that ,
the shaver is being charged.
Note: The shaver cannot be placed in the Jet Clean System when the protection
cap is on the shaving unit.
B
A
ENGLISH ENGLISH
4 Turn the lock anticlockwise (A) and remove the retaining frame (B).
5 Remove and clean one shaving head at a time. Each shaving head
consists of a cutter and a guard.
Note: Do not clean more than one cutter and guard at a time, since they are
all matching sets. If you accidentally mix up the cutters and guards, it may take
several weeks before optimal shaving performance is restored.
Remove the cutter from the shaving guard and clean it with the brush. -
- Clean the inside and outside of the shaving guard with the brush.
6 Put the shaving heads back into the shaving unit.
Note: Make sure that the projections of the shaving heads fi t exactly into the
recesses.
7 Put the retaining frame back into the shaving unit and turn the lock
clockwise.
8 Insert the lug of the shaving unit into the slot in the top of the shaver.
Then close the shaving unit.
Note: If the shaving unit does not close smoothly, check if you have inserted
the shaving heads properly and if the retaining frame is locked.
Cleaning the shaving unit in the Jet Clean System
The Jet Clean System cleans the shaving unit.
A
B
Preparing the Jet Clean System for use
Note: Fill the cleaning chamber before fi rst use and when the ‘fl uid low’ symbol
fl ashes to indicate that the fl uid level is too low. When the fl uid level drops
below the minimum level, the cleaning symbol and the ‘fl uid low’ symbol start
to fl ash and the shaver holder returns to its starting position
1 Simultaneously press the release buttons on both sides of the
cleaning chamber (A). Then lift the Jet Clean System off the cleaning
chamber (B).
The cleaning chamber remains behind. ,
2 Unscrew the cap from the bottle with Jet Clean solution
(HQ200) and remove the airtight seal.
3 Fill the cleaning chamber with Jet Clean solution (HQ200) up to the
MAX indication.
Note: Make sure the cleaning chamber is always fi lled above the MIN
indication.
4 Place the Jet Clean System back onto the cleaning chamber (‘click’).
Make sure that the release buttons snap back into place.
When the cleaning chamber is fi lled with Jet Clean solution, do not move
it to prevent leakage.
5 Put the small plug in the Jet Clean System and put the adapter in the
wall socket.
The shaver holder automatically moves to its highest position. ,
The Jet Clean System is now ready for use.
Using the Jet Clean System
1 Place the shaver without protection cap upside down in the shaver
holder. Push down the locking lever completely to lock the shaver
into place.
The battery symbol on the Jet Clean System goes on to indicate that ,
the shaver is being charged.
Note: The shaver cannot be placed in the Jet Clean System when the protection
cap is on the shaving unit.
B
A
ENGLISH ENGLISH
PT729CC_A6_CS3.indd 32 13.4.26 2:47:19 PM