


3. Select the calibrator mode (“CALIB” on display) by pressing the
CALIB/METER function button.
4. Select type K thermocouple (“K” on display) by pressing the SENSOR
SELECT function button until type K is reached.
5. Select the tenth degree display with a digit appearing after the decimal
point on the display) by pressing the 0.0.1 function button.
6. Select °F (“°F” on display) by pressing the °F °C function button.
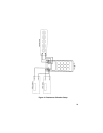
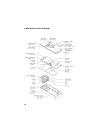
7. Attach the
Alloy Mode Calibrator Verification Cables
per Fig. 12 & 13. If
you are using a
Type K Thermocouple Temperature Simulator ITS-90
you will use the regular set up. If you are using a
Precision Voltage
Source
use the alternate set up. When performing the following proce-
dure using a
Precision Voltage Source
with the alternate set up, any-
where a temperature is transmitted (output) by the
Thermocouple
Temperature Simulator
, you should adjust the
Voltage Source
to the
equivalent voltage as listed by a Type K N.I.S.T. ITS-90 Thermocouple
Reference Table. (Example: 32.0 °F would equal 0.000 mV)
8. Press the CHANGE function button and the numerical display will blink
and “NUM” will appear on the display.
9. Press 3 2 0 buttons and then press the ENTER function button. “NUM”
will disappear and “32.0 °F” will appear, not blinking.
10. Adjust the
Thermocouple Temperature Simulator
to 32.0 °F.
00. Note: The reading on the voltmeter should read null. 0.000 mV. Adjusting
the CL25 to any temperature and adjusting the Temperature Simulator to
the same temperature should result in a null, or 0.000 mV on the volt-
meter.
11. Remove the
Alloy Mode Calibrator Verification Cable
from all equipment.
12. The Alloy Mode verification is now complete. Press the OFF function but-
ton to turn the unit off.
37