


11
simply multiplied values, thus the same effect can be added later on in image editing
software. Therefore, changing the value from 100 is not recommended.
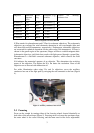
3.3.3 Exposure Mode
In the Exposure Mode box, select either Automatic or Manual:
• Automatic (AE): The software measures the optimal exposure time
automatically. Change Spot and Exposure Adjust if needed (see below). To
lock the exposure time, click AE lock button (Figure 15, upper toolbar,
rightmost button).
o Spot defines the size of an area from which exposure time is measured.
Choose 30 %, 1 % or 0.1 % of picture area. To move the spot, there is
a button in the upper toolbar (Figure 15, upper toolbar, third button
from right). Click the button and then click live view image in a place
where you want the exposure area to be. Re-centering the area is done
with the button on the right-hand side of the Spot button.
o Exposure Adjust is used for adjusting the automatic exposure time.
Use values from 0 to 2 to brighten (longer exposure) the image and
values from -2 to 0 to darken (shorter exposure) the image.
• Manual: You can adjust the exposure time manually using the Exposure
Time slider.
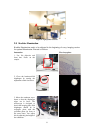
3.3.4 White balance
White balance is the adjustment of relative intensities in red, green, and blue channels.
White balance adjustment is needed because the halogen lamp in the microscope
changes color with the change of intensity. The dimmer the light, the more red it
becomes.
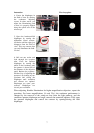
Pressing the button marked with OWB will automatically adjust the white point of the
image. If manual adjustment is needed, press the WB-button and make a selection in
the image that represents white color. The image is adjusted accordingly. The best
white balance is achieved by pressing the OWB-button while the sample is out of the
view (the whole camera view area is white) so it does not disturb the measurement of
the color of the light.
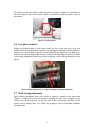
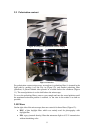
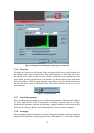
3.3.5 Levels adjustment
You can adjust the brightness, contrast, and gamma correction of the image in the
levels adjustment dialog (Main Menu/BF-button/Settings/Level Adjustment tab).
Start the adjustment by clicking the levels button (marked with red square in Figure
16). The window contains an image histogram, which shows the intensity distribution
of the image. Wide histogram indicates that good dynamic range of the camera was
used. A peak at the right end means that there are oversaturated pixels in the image.
You should avoid over saturation by shortening the exposure time.
The Channel selection lets you adjust one color at a time. In the RGB setting, your
adjustments will affect all colors. Adjust Shadow and Highlight for brightness and
contrast, and Gamma for gamma correction. Note that Gamma is a non-linear
change and has to be mentioned in the legend when the image is published.