


10
3 Image acquisition
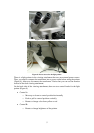
3.1 Accessing the computer
If the computer is turned off, push the power button to turn it on. When the login
screen appears, log in using your hyad login account. Check that the domain is set to
LTDK.
3.2 View Finder application
A 10-bit Olympus DP50 color CCD camera is attached on the top of the microscope.
It is controlled by a computer and Studio Lite software.
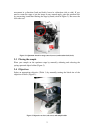
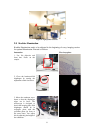
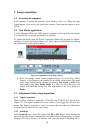
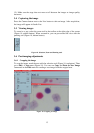
To capture an image, open the Pixera Corporation Studio Lite program by double-
clicking its icon on the desktop (Figure 14). Then, open up View Finder by clicking
the camera button in the menu at the top.
Figure 14. Starting the Studio Lite and View Finder applications
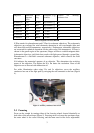
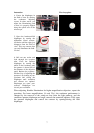
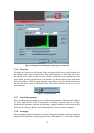
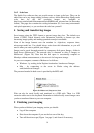
Figure 15. Adjustments in View finder window
• Press ‘Live image’ button (green triangle in Figure 15) in the View Finder
window. A live image of your sample will be shown on the screen. The speed
of the image refresh can be adjusted by selecting Fast, Zoom, or Full in the
main menu under View Finder Mode. It is easier to focus and move the
sample with the Fast setting. For fine adjustment of the focal plane, use
Zoom.
3.3 Adjustments before image acquisition
3.3.1 Capture resolution
There are three resolutions (640x480, 1392x1040, and 2776x2074) to choose from
(Figure 15). Use higher resolution for more details, if the bigger file size does not
matter. The highest resolution is slower to acquire than the other two. Resolution
selection does not affect the live view image.
3.3.2 Sensitivity
In the Sensitivity box, select ISO values from 50 to 400. Higher value shortens the
exposure time but increases background noise and decreases image quality. In digital
imaging, ISO 100 is the level of intensity read from the sensor. Everything else is