


26
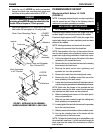
FRAMEPROCEDURE 7
F
R
A
M
E
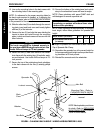
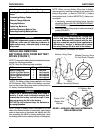
INSTALLING BACK ASSEMBLY -
WHEELCHAIRS BUILT BEFORE
10/2000 ONLY (FIGURE 3)
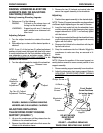
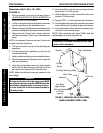
1. Position the back assembly on the seat upholstery
with the back canes and spreader bar facing UP.
2. Locate the two (2) back canes between the two (2)
back cane mounting plates.
NOTE: The back canes will fit tightly between the back
cane mounting plates. Some marring of NON-VISIBLE
portions of the back canes and back cane mounting plates
is possible.
3. Slide the two (2) inserts into the back canes. Make
sure the mounting holes in the inserts and the back
canes line up.
4. Determine the mounting holes in the back cane mount-
ing plates for the necessary back angle. Refer to
CHANGING BACK ANGLE in this procedure of the
manual.
5. Install the two (2) LOWER hex bolts and washers
through the back cane mounting plate, back cane
and insert at the position determined in STEP 4.
6. Secure the hardware in STEP 5 with two (2) locknuts.
Use Loctite 242 and tighten to 75-inch pounds.
7. Flip the back assembly to the UP position as shown in
FIGURE 3.
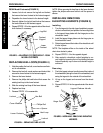
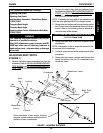
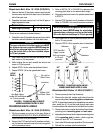
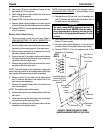
FIGURE 2 - ADJUSTING SEAT DEPTH
Phillips Screws
Washer
Plug Button
Crossbrace
Seat Extension Tube
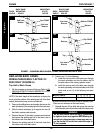
7. Remove the hex screw, coved spacers, washers and
locknut that secure the two (2) existing crossbraces
together.
NOTE: Note coved spacer, washer and locknut order for
reinstallation.
8. Assemble the two (2) new crossbraces together. Re-
fer to FIGURE 1 for hardware orientation.
9. Reinstall the hex screws, washers and locknuts that
secure the bottom of the two (2) new crossbraces to
the wheelchair frame and tighten.
10. Reinstall the hex screws and locknuts that secure the
pivot links to the wheelchair frame and crossbraces
and tighten.
11. Secure wiring harness to the new crossbraces with
tie wraps.
12. Reinstall the black dust covers onto the bottom of the
crossbraces.
13. Install the new back and seat upholstery onto the
wheelchair. Refer to
REPLACING BACK UPHOL-
STERY and REPLACING SEAT UPHOLSTERY in
PROCEDURE 6 of this manual.
14. Reinstall the battery tray and battery boxes/batteries
onto the wheelchair. Refer to
INSTALLING/REMOV-
ING BATTERY TRAY and INSTALLING/REMOVING
BATTERY BOXES in PROCEDURE 8 of this manual.
ADJUSTING SEAT DEPTH
(FIGURE 2)
1. Remove the existing seat upholstery from the wheel-
chair. Refer to REPLACING SEAT UPHOLSTERY in
PROCEDURE 6 of this manual.
NOTE: If adjusting seat depth of the wheelchair, the seat
upholstery MUST be changed as well.
2. Remove the two (2) plug buttons from the ends of the
crossbraces that are towards the front of the wheel-
chair.
NOTE: The two (2) plug buttons will be used in the ends
of the seat extensions.
3. Install the two (2) seat extension tubes into the ends
on the crossbraces. Line up the second mounting
hole from the rear of the seat extension tube with the
front mounting hole in the crossbrace.
4. Install the new seat upholstery onto the wheelchair.
Make sure to line up the mounting holes in the seat
extension tubes with the new seat upholstery. Refer
to
REPLACING SEAT UPHOLSTERY in PROCE-
DURE 6 of this manual.
5. Install plug buttons into the ends of the seat extension
tubes.