


Power Tilt Only For M71 And M91. 20 Part No.1118362 Rev A
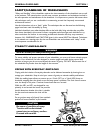
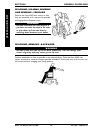
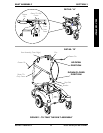
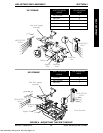
TILTING THE SEAT ASSEMBLY (FIGURE 2)
NOTE: Removing the seat is not necessary to access to the battery compartment on wheelchairs
equipped with a power tilt only seating system. The seat assembly with power tilt only tilts back and
propped in place to provide access to the batteries and underside of the seat.
WARNING
Make sure power to the wheelchair is OFF before performing this procedure.
NEVER leave the seat assembly in the UP/OPEN position unless necessary to
preform a procedure on the wheelchair - otherwise injury or damage may
result.
After ANY adjustments, repair or service and BEFORE use, make sure all
attaching hardware is tightened securely - otherwise injury or damage may
result.
TILTING THE SEAT ASSEMBLY BACK
1. Place the wheelchair in a well ventilated area where work can be performed without risking
damage to carpeting or floor covering.
2. Verify the joystick ON/OFF switch is in the OFF position and disconnect joystick cable.
3. Remove front rigging. Refer to owner's manual shipped with wheelchair.
4. Remove the two (2) detent pins securing the power tilt only frame to the front seat
posts as shown in DETAIL "A" OF FIGURE 2.
5. Firmly grasp the front edge of the seat assembly, slowly tilt the seat assembly BACK into
the UP/OPEN position.
6. Remove prop rod from the clip located on the power tilt only frame and engage the prop
rod end in to the support bracket and shown in DETAIL "B" OF FIGURE 2.
7. Gently allow weight of seat assembly to be supported by the prop rod.
NOTE: Only leave the Seat assembly in the UP/OPEN position while performing any necessary proce-
dures. Always lower the seat assembly to the DOWN/CLOSED position when not servicing the wheel-
chair.
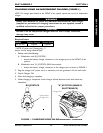
TILTING THE SEAT ASSEMBLY FORWARD
1. Using one hand, firmly grasp the front edge of the seat assembly and lift until seat assem-
bly is no longer supported by the prop rod.
2. Disengage prop rod from the support bracket and secure into clip as shown in DETAIL
"B" of FIGURE 2.
3. Using both hands, slowly tilt the seat assembly FORWARD into the DOWN/CLOSED
position.
WARNING
Ensure the two (2) detent pins are fully engaged and the power tilt only frame
is securely locked in place before use - otherwise injury or damage may result.
4. Insert the two (2) detent pins through both the power tilt only frame and the two (2)
front seat posts as shown in DETAIL "A" of FIGURE 2.
SECTION 3
SEAT ASSEMBLY
SEAT ASSEMBLY