


23
This Procedure includes the following:
Back Height Adjustment (Adjustable Backs Only)
Sliding Seat Adjustment
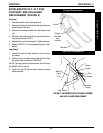
Excelerator XLT/XLT 2000 Back Angle Adjustment
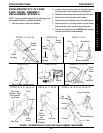
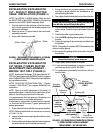
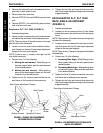
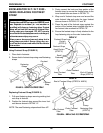
BACK HEIGHT ADJUSTMENT
(ADJUSTABLE BACKS ONLY)
(FIGURE 1)
1. Unlatch the two (2) fastening flaps that secure the top
of the back upholstery to the back canes.
WARNING
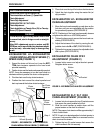
Push pin MUST protrude through hole in back cane.
Ensure that both back cane inserts are at the same
height BEFORE reassembling the chair.
2. Press the push pin on the back cane insert tube in and
adjust the back height to one (1) of three (3) heights
depending on original back height.
3. Reinstall the fastening flaps onto the back canes, en-
suring the fastening strips face towards the front of
the Excelerator.
NOTE: The fastening flap with the
Invacare
logo is for the
left back cane.
BACK/SEAT PROCEDURE 9
Top of Back
Upholstery
Back Canes
Fastening Flaps
Push
Pin
FIGURE 1 - BACK HEIGHT ADJUSTMENT
(ADJUSTABLE BACKS ONLY)
4. Secure the top of the back upholstery to the fastening
flaps ensuring the top of the back upholstery is even
with the top of the back canes.
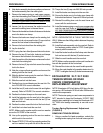
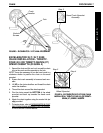
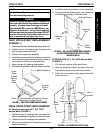
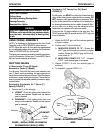
SLIDING SEAT ADJUSTMENT
(FIGURES 2 AND 3)
Excelerator/Li'l Excelerator (FIGURE 2)
NOTE: The seat is supported on adjustment rails to
allow forward/rearward adjustment. The adjustment
lever is located on the underside of the seat, at the
front left.
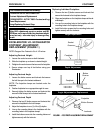
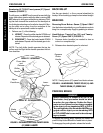
1. Activate parking brake.
2. Grasp forward/rearward adjustment lever and push
it to the right and slide seat forward or rearward.
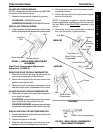
3. Ensure that seat is properly engaged into the seating
position you desire by "jiggling" the seat, making sure
that the seat engages into the locking notch and ad-
justment lever returns to its original forward facing
position.
NOTE: User need not be in seat to slide seat forward
or rearward.
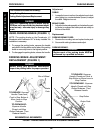
REPLACEMENT.
1. Remove the locknuts, bolts, and coved spacers
from both sliding seat rail brackets.
2. Remove sliding seat and seat rails from brackets.
Seat
Back
Adjustment Lever
Seat Rail Bracket Locknuts, Bolts, and
Coved Spacers (Both Sides)
Seat Rails
Seat Rail
Locknuts
and
Threaded
Studs (Both
Sides)
FIGURE 2 - SLIDING SEAT ADJUSTMENT -
EXCELERATROR/LI'L EXCELERATOR
WARNING
After ANY adjustments, repair or service and BE-
FORE use, make sure all attaching hardware is tight-
ened securely - otherwise injury or damage may
result.
B
A
C
K
/
S
E
A
T
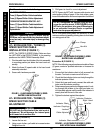
Back
Cane
Insert