


14
F
O
R
K
/
S
P
R
I
N
G
/
C
R
A
N
K
EXCELERATOR/LI'L
EXCELERATOR FORK ASSEMBLY
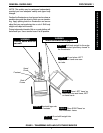
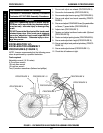
INSTALLATION (FIGURE 1)
1. Remove the fork assembly from the packaged con-
tainer.
2. Slide fork assembly through the opening in the front
frame (Goose Neck) making sure to seat washer
and ball bearing housing.
3. Seat ball bearings on fork assembly.
4. Place locknut over fork assembly and tighten.
5. Tighten locknut setscrews.
EXCELERATOR/LI'L
EXCELERATOR TENSION SPRING
INSTALLATION (FIGURE 1)
NOTE: The tension spring is NOT intended to keep the
Excelerator straight when pedaling but to keep the
Excelerator from leaning excessively to one side or an-
other.
1. Tighten eye bolts into fork assembly and front frame.
2. Using a medium flat head screwdriver, hook the ten-
sion spring to the fork assembly and front frame eye
bolts.
NOTE: Tension is applied by loosening or tightening the
eye bolts. This should be done before installation of the
tension spring.
This Procedure includes the following:
EXCELERATOR/LI'L EXCELERATOR:
Fork Assembly Installation
Tension Spring Installation
Hand Crank Assembly Installation
EXCELERATOR XLT/XLT 2000:
Fork /Crank Assembly Replacement
Tension Spring or Road Crown Compensator
Replacement/Adjustment
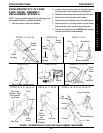
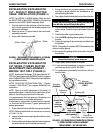
Locknut
Fork Assembly
Front Frame
Opening
Goose Neck
Ball Bearings
Eye Bolt
FIGURE 1 - EXCELERATOR/LI'L EXCELERATOR FORK
ASSEMBLY/TENSION SPRING INSTALLATION
Eye Bolt
Tension Spring
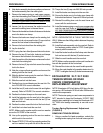
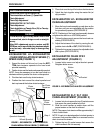
Adjustable
Chain Idler
Washer
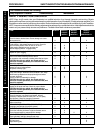
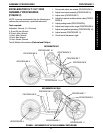
EXCELERATOR/LI'L
EXCELERATOR HAND CRANK
ASSEMBLY INSTALLATION
(FIGURE 2)
1. Remove the chain from the front wheel hub so it moves
with the hand crank assembly.
2. Slide the hand crank assembly over and completely
down the fork stem.
3. Position the chain on the hand crank sprocket as-
sembly and the front wheel hub.
4. Move the hand crank assembly up or down on the
fork stem until you are comfortable with the position
for operational purposes.
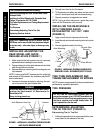
NOTE: Positioning of the hand crank assembly loosens
or tightens the chain in an UP/DOWN position.
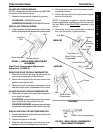
5. Tighten hex nut to secure the hand crank assembly.
6. Adjust the tautness of the chain by moving the ad-
justable chain idler IN or OUT.
7. Tighten the hex screw to secure the adjustable chain
idler in place.
Fork
Stem
FIGURE 2 - EXCELERATOR/LI'L EXCELERATOR HAND
CRANK ASSEMBLY INSTALLATION
Hex Nut
Step 5
PROCEDURE 5 FORK/SPRING/CRANK
WARNING
After ANY adjustments, repair or service and BE-
FORE use, make sure all attaching hardware is
tightened securely - otherwise injury or damage
may result.
DO NOT operate the Excelerator if the hand crank
obstructs your view. If the hand crank obstructs
your view, adjust the height BEFORE using the
Excelerator - Otherwise injury or damage may
occur.
Ball Bearing Housing