


Operator Manual
748223-K
June 2002
Rosemount Analytical Inc. A Division of Emerson Process Management Calibration and Adjustments 4-9
Model 7003M
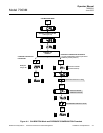
To determine if current output
linearization is necessary, do the
following:
1. Connect a separate current meter to
the output terminals (any device that
will display an accurate current
measurement such as a computer
input will suffice).
NOTE
Do not simply connect a current
measurement meter in parallel with the
usual load because this will lead to in-
correct readings.
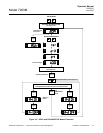
2. Place the instrument in DIAGNOSTIC
mode by pressing the UP and DOWN
ARROWS, followed by the DISPLAY
and ACK keys. The display will show
consecutively:
tSt, d-3, d-4, and oxygen input
voltage
3. Press the DISPLAY key until the
minus sign and a number are
displayed. This reading is the current
output (in milliamps) as determined by
the Model 7003M.
4. Use the UP and DOWN ARROW
keys to increase the display reading,
and occasionally, compare the current
displayed on both meters (the
instrument display and the separate
meter).
5. If the two readings are too disparate
(different applications require lesser
or greater tolerance), do the following
3-point calibration to linearize the
current output:
6. Use the UP and DOWN ARROW
keys to set the current output to a
value halfway up its range. The
operator may prefer to set it at a
critical measurement point.
7. Press the CAL key. The instrument
will flash CCA, illuminate the three
right-hand carets, and continue
displaying the current output.
8. Use the UP and DOWN ARROW
keys to adjust the actual current
output (as noted on the separate
meter) to the correct amount. Note
that the instrument display does not
change.
9. Press ENTER, the instrument
displays diA, returns to the
DIAGNOSTIC mode, and continues to
display the current output.
10. Use the UP and DOWN ARROW
keys to adjust the current output to a
lower value, representing the low
range (the operator may prefer to use
4 mA to represent 0% oxygen).
11. Press CAL (the instrument displays
CCL for lower current output setting),
and repeat steps 3 and 4 of this
procedure.
12. Use the UP and DOWN ARROW
keys to adjust the current output to a
value higher than the initial calibration
value (step 1 of this procedure),
representing the higher range (the
operator may prefer to set it at
16.72mA to represent 20.9% oxygen.
13. Press CAL (the instrument displays
CCH for high current output setting),
and repeat steps 3 and 4 of this
procedure.
To return to the RUN mode, press
ENTER twice.
At any time during this procedure, the
operator may press the ACK key to reset
all calibration coefficients to default
values. Pressing DISPLAY at any time
during this procedure will cause the
instrument to display for a moment the
relevant calibration efficient.
The operator may escape the current
CALIBRATION and DIAGNOSTIC mode
altogether by pressing ENTER twice.
Note, all coefficients will return to the
default values, and the current calibration
procedure must be started over to
linearize current output.