


2
Setup
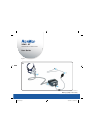
Refer to illustration A.
1. Connect the DC plug of the power supply unit to the rear of the device.
2. Connect the power cord to the power supply unit.
3. Plug the other end of the power cord into the power outlet.
4. Connect one end of the air tubing firmly onto the air outlet.
5. Connect the assembled mask system to the free end of the air tubing.
Control panel
Refer to illustration B.
The control panel of your device includes the following items:
1. Start/Stop button: Starts or stops treatment
2. LCD screen: Displays the menu, treatment and reminder screens
3. Info menu button*: Allows you to view your sleep statistics
4. Setup menu button*: Allows you to make changes to settings
5. Push dial: Turning the dial allows you to scroll through the menu and change settings. Pushing
the dial allows you to enter into a menu and confirm your choice.
*The Info and Setup menus are disabled if S9 Essentials has been enabled by your clinician.
Navigating the menus
Refer to illustration C.
In general, to navigate the menus:
1. Turn until the parameter you require is displayed in blue.
2. Press . The selection is highlighted in orange.
3. Turn until you see the setting that you require.
4. Press to confirm your choice. The screen returns to blue.
Getting started
1. Make sure the power is connected.
2. Adjust the ramp time if required.
3. Fit your mask as described in your mask user guide.
4. To start therapy, simply breathe into the mask and/or press .
5. Lie down and arrange the air tubing so that it is free to move if you turn in your sleep.
6. To stop treatment at any time, remove your mask and/or press .