


8 www.pridemobility.com Backpacker
III. INSTALLATION
BACKPACKER LIFT SYSTEM INSTALLATION
WARNING! Prevent product and/or vehicle damage! The Backpacker Lift should be installed
by an authorized service technician only.
NOTE: Use only the supplied hardware to install the Backpacker Lift System.
NOTE: If you are installing the Backpacker into a full-sized van, refer to the information provided in
separate literature for side-entry securement system installation. If you are installing the Backpacker
into a mini van, refer to the following information.
Follow these steps to install the Backpacker:
1. Remove the rear seat from the van according to the vehicle manufacturer removal instructions.
2. Route the Backpacker wiring harness through the vehicle. See “Wiring Harness Installation.”
WARNING! Prevent product damage! Route the wiring harness through the vehicle rather
than under the vehicle to avoid coming in contact with sharp edges, extreme temperatures,
moving parts, and roadway debris. Power shorts may occur if wires come in contact with
hot exhaust parts or sharp edges.
WARNING! Never attach the wiring harness to a secondary power source. Do not attempt
to use trailer wiring to power the lift system. The wiring harness must be connected
directly to the vehicle battery.
NOTE: If your lift is equipped with an optional onboard battery, refer to “Onboard Battery Installation.”
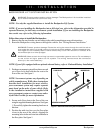
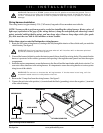
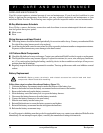
Figure 1. Basic Securement System Installation
FLOOR PLATE
MOUNTING HARDWARE
MID-RISER BAR
3. Position a securement system floor plate over each
set of floor locks that hold the rear seat to the
floor of the van. See figure 1.
NOTE: Securement systems vary depending on
vehicle manufacturer. While these instructions
describe basic installation for most vehicles,
your securement system may require separate
parts based on the make of your vehicle. Refer
to the installation instructions supplied with
your securement system or contact your autho-
rized Pride Provider for more information.
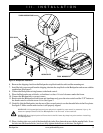
4. Secure each floor plate to the floor of the van
using the supplied mounting hardware. See figure
1. Do not fully tighten the mounting hardware at
this time.
5. Position the mid-riser bar over the floor plate
closest to the rear of the vehicle, aligning the
mounting holes in the mid-riser bar with those in
the floor plate. See figure 1.