16 www.pridemobility.com Backpacker
VI. CARE AND MAINTENANCE
CARE AND MAINTENANCE
Your lift system requires a minimal amount of care and maintenance. If you do not feel confident in your
ability to perform the maintenance listed below, you may schedule inspection and maintenance at your
authorized Pride Provider. The following areas require periodic inspection and/or care and maintenance.
90-Day Maintenance Schedule
Every 90 days, remove the battery connections and clean them to ensure uninterrupted electronic connec-
tion and grease these pivot points:
! Main screw
! Pivot
Wiring Harness and Hand Control
! The wiring harness should be checked periodically for corrosion and/or decay. Contact your authorized Pride
Provider if the wiring harness needs to be replaced.
! Avoid leaving the hand control in areas where it will be exposed to inclement weather or temperature extremes.
Exposure to the elements may cause damage to the hand control.
Lift Platform/Metal Components
! Check the lift platform for wear or damage. Contact your authorized Pride Provider for repair or replacement.
! The lift platform surface may become slippery if exposed to moisture (ice, snow, rain, mist/spray conditions,
etc.). Use caution when loading/unloading a mobility device in these conditions and wipe off any excess
moisture from the lift platform.
! Regularly inspect the metal lift components for scratches. Treat any problem areas with a rust inhibitor or metal
sealant.
Battery Replacement
WARNING! Battery posts, terminals, and related accessories contain lead and lead
compounds. Wash hands after handling.
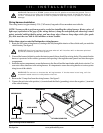
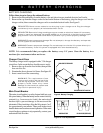
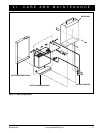
Follow these steps to replace the onboard battery (figure 11):
1. Unfasten the battery securement strap located at the bottom of the battery box.
2. Remove the hardware from the battery securement bracket and remove the bracket.
3. Remove the hardware from the battery connector.
4. Slide the battery out of the battery box to expose the battery harness.
5. Disconnect the battery harnesses from the battery terminals.
6. Connect the battery harnesses to the new battery.
7. Slide the new battery into the battery box.
8. Reinstall the hardware to secure the battery connector and tighten.
9. Reinstall the battery securement bracket and tighten the hardware.
10. Refasten the battery securement strap.
If your lift system is exhibiting wear that you feel is questionable in any way, contact your authorized Pride Provider
immediately. Do not attempt to repair, adjust, or modify the manufacturer settings and materials.


