


32
www.pridemobility.com Celebrity/RevH/Apr03
ASSEMBLY
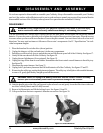
1. Place the freewheel lever in the drive (down) position.
2. Position the front and rear sections next to each other.
3. Tilt the rear end to a horizontal position, insert the longer tube of the front end into the rear section first, and
make sure that the locking cam levers are vertically positioned and the locking pins are removed.
4. Slide the two sections of the unit together until the front half reaches its insertion limit.
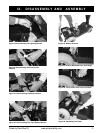
5. Secure the front and rear sections with ball detent pins.
6. Push the frame lock levers back to their locked (downward) position.
7. Plug the large 9-pin white plastic harness from the front section of the Celebrity into the mating plug found on
the control assembly cover on the utility tray at the rear of the Celebrity. The two orange dots present on both
plugs should be adjacent to each other and enable quick plug mating.
8. Put the batteries in place and plug the 2-pin battery harnesses into the adjoining harnesses that are also located
on the control assembly.
9. If the utility tray has been removed, when reinstalling it, be sure the tray is firmly pressed down on the reusable
fasteners that holds it to the scooter, then reconnect the 6-pin motor harness.
10. Gently place the rear shroud over the seat pedestal.
11. Connect the rear light harness (if so equipped).
12. Slide the shroud down in place. Make sure that the rear plastic shroud does not make any contact with the rear
wheels.
13. Carefully lift the seat and slide the small seat post (on the seat bottom) into the seat pedestal.
14. Rotate the seat until it locks into place.
IX. DISASSEMBLY AND ASSEMBLY