


30
www.pridemobility.com Celebrity/RevH/Apr03
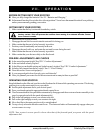
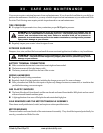
IX. DISASSEMBLY AND ASSEMBLY
No tools are required to disassemble or assemble your Celebrity. Always disassemble or assemble your Celebrity
on a level, dry surface with sufficient room for you to work and move around your scooter. Keep in mind that the
disassembled sections of the Celebrity takes up more floor space than the assembled Celebrity.
DISASSEMBLY
You can disassemble the Celebrity into six pieces: the seat, the front frame, the rear frame, the rear shroud, and the
batteries. You can also remove the utility tray to lighten the weight of the rear section if necessary. Place the scooter
in an area where you have sufficient clearance to move the parts around. You need about four or five feet in all
directions. You may need assistance to lift some of the scooters components. See IV. Specifications for indi-
vidual component weights.
1. Place the freewheel lever in the drive (down) position.
2. Unplug the charger, coil the cord and store it in the rear compartment.
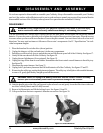
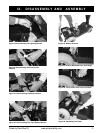
3. Push down on the seat lock lever to unlock the seat and lift the seat up and off of the Celebrity. See figure 17.
4. Gently lift the rear shroud off of the Celebrity. See figure 18.
5. Unplug the rear light harness (if so equipped). See figure 19.
6. Unplug the large white front-to-rear harness that attaches the front control console harness to the utility tray.
See figure 20.
7. Disconnect the motor harness. See figure 21.
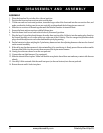
8. Unplug both 2-pin battery harnesses and lift both batteries off of the Celebrity. See figures 22 and 23.
9. If removing the utility tray, unplug the 6-pin motor harness. The utility tray is held place with reusable fasteners,
to remove it, gently pull the tray straight up and off the scooter.
10. Grab the handle grip on the tiller, pull upward on the release lever and gently lower the tiller down tothe cen-
ter of the Celebrity chassis until it is fully lowered.
11. Remove ball detent pins and lift the locking levers. See figures 24 and 25.
12. Lift up on the front section to separate it from the rear section. See figure 26.
Figure 17. Seat Removal Figure 18. Shroud Removal
WARNING! Lifting weight beyond your physical capability may result in personal injury.
Ask for assistance when necessary while disassembling or assembling your scooter.
CAUTION! Failure to unplug both battery harnesses and the control console assembly
harness prior to disassembly could result in permanent damage to the scooter.