


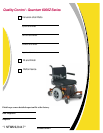

Quantum 6000Z Series www.quantumrehab.com 41
VII. CARE AND MAINTENANCE
When to See Your Quantum Rehab Specialist for Service
The following symptoms could indicate a serious problem with your power chair. If necessary, contact your Quantum
Rehab Specialist. When calling, have the model number, serial number, nature of the problem, and the error code if
available.
! Motor noise
! Frayed harnesses
! Cracked or broken connectors
! Uneven wear on any of the tires
! Jerky motion
! Pulling to one side
! Bent or broken wheel assemblies
! Does not power up
! Powers up, but does not move
Corrective Maintenance
If the battery condition meter does not light up when you turn on the power:
! Check the harness connections. Make sure they are tight.
! Check the circuit breaker. Reset it if necessary.
! Check the battery connections.
If the above conditions prove normal, you can load test the batteries with a battery load tester. These testers are available
at automotive parts stores. Disconnect both batteries before load testing and follow the directions that come with the load
tester. If either one of the batteries fails the load test, replace both of them. If your power chair still does not power up,
contact your Quantum Rehab Specialist.
To replace the batteries:
1. Turn off the power to the controller.
2. Make sure that the power chair is in drive mode. See III “Your Power Chair.”
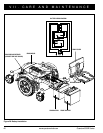
3. Remove the foot platform by squeezing the release handles (see figure 29) and lifting the foot platform bracket up
and away from the power base.
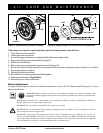
4. Disconnect the quick release battery connectors. See figure 7.
5. Remove the batteries.
6. Disconnect the battery harness from each battery.
WARNING! Make sure you tighten the fasteners so that the connections are secure.
7. Connect the battery harness to the new front battery according to the battery wiring diagram. See figure 29.
8. Connect the battery harness to the new rear battery according to the battery wiring diagram. See figure 29.
9. Install the new batteries.
10. Reinstall the front cover and foot platform.
11. Charge the batteries. See VI. “Batteries and Charging.”