


Erwin Sabio Philips CM12 Alignment & Setup Manual Page 11
Sample Loading & Unloading
Mounting the Sample
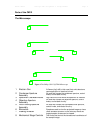
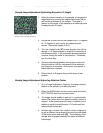
Figure 13 An example of a TEM grid
used to hold thin film samples
1.
Samples for the CM12 are deposited as thin films on a
copper mesh grid such as in Figure 13. This grid is the
one loaded into the specimen holder (Figure 4) by first
lifting the specimen clamp [24] using a pin-looking tool.
(Note: Care must be taken to lift the clamp very gently
so as not to break the fragile contraption. In addition,
never touch the rod between the o-ring [23] and the
specimen cavity at any point during sample mounting.)
2.
Using a pair of tweezers, carefully grab one side of the
sample grid and lower it into the specimen cavity.
(Note: Never grab the mesh in any other way so as not
to distort the mesh or scrape away the sample.)
3.
Gently lower the clamp in place using the pin tool to
ensure the sample is locked in place.
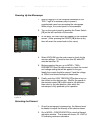
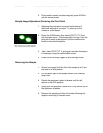
Inserting the Specimen Holder
1.
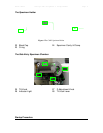
Before inserting the specimen holder into the side entry
chamber [3] (also called goniometer), check to make
sure the tilt [25] is at 0 degrees and the lever [28] is in
lock position.
2.
Grab the end of the specimen holder nearest the black
cap [22] and ensure that the slit on the cap is at the 8:00
position when inserted to the chamber. Push the holder
further until a click as heard.
3.
The red indicator light [26] will turn on as the chamber
begins to be evacuated. Wait for this light to turn off
before proceeding to the next step.
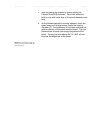
4.
When the light goes off, turn the specimen holder
counter clockwise until the slit is at the 3:00 position.
5.
Gently support the rod as it gets sucked further into the
chamber to prevent damage to the tip with the sample.
6.
To “see” the sample on the large screen, spread the
beam then adjust the stage controls [8] so that the
viewing area is at the center of the opaque grid.