


PAGE 28 — FCG16HA SAW • OPERATION AND PARTS MANUAL — REV. #1 (03/19/10)
See the engine manual supplied with your
machine for appropriate
engine maintenance schedule and
troubleshooting guide for problems.
MAINTENANCE
ALWAYS allow the engine to cool before
servicing. NEVER attempt any maintenance
work on a
hot!
engine.
■
REMOVING
or
INSTALLING
blades
■
ADJUSTING
front or rear pointers
■
LUBRICATING
any components
■
REMOVING
engine mounting bolts
■
INSPECTING, ADJUSTING, OR
REPLACING
drive belt, arbor shaft, arbor shaft bearings
or
ANY
engine part
ALWAYS ensure that the engine
ON/OFF switch is in the "OFF"
position and that the arbor shaft has
COMPLETELY STOPPED
ROTATING before performing any
of the the following operations:
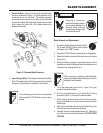
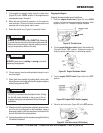
Front Pointer Adjustment
The front pointer and rear guide have been set at the factory.
Use these procedures only if the pointer or guide are suspect of
being out of alignment.
3. Adjust the front pointer so it just touches the side of the
straight-edge or level.
4. Remove the straight-edge or level.
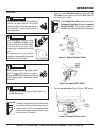
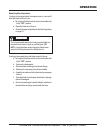
5. Position the front pointer and blade directly over the chalk
line.
6. Start the saw and lower the blade onto the chalk line.
7. Begin cutting and make sure the blade follows the chalk line
as closely as possible.
8. The pointer should follow the chalk line as well. If it does not,
adjust the pointer by loosening then tightening the jam nuts
on the pointer until the pointer follows the same path as the
blade.
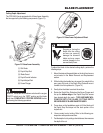
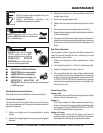
Rear Guide Adjustment
The rear guide is useful on long runs that allow the operator to
follow the line with less effort as well as cutting up to a wall
where the front pointer is lifted.
1. Chalk out a straight line on the prepared slab or cutting
surface.
2. Cut a straight line about 10 - 12 feet (3 - 4 meters) in length.
3. Adjust the rear guide until it falls into the cut.
4. The rear guide should ride in the cut freely without the feel
of it pushing the front pointer or blade off line. If it feels like it
is doing so, turn the saw off and after the blade has COM-
PLETELY STOPPED ROTATING, adjust the rear guide by
loosening then tightening the jam nuts on the guide until it
rides freely in the cut.
1. Chalk out a straight line on the prepared slab or cutting
surface.
2. Use a 4 foot straight-edge or level by placing it flat against
the blade.
Saw Blade Removal and Installation
Saw blade removal and installation is covered on pages 21.
CAUTIONCAUTION
CAUTIONCAUTION
CAUTION
WARNINGWARNING
WARNINGWARNING
WARNING
General Engine Care
Engine check:
Check daily for any oil and/or fuel leakage, thread nut & bolt
tightness, and overall cleanliness.
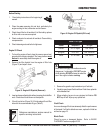
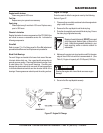
Engine oil:
Check daily. Inspect with blade removed and saw frame
level on a level surface. Keep the oil clean, and at the proper
servicing level (Figure 8). DO NOT OVERFILL! SAE 10W-
30 of SG is recommended for general use.
Engine oil change:
Change engine oil after the first month or 20 hours of
operation, then every 3 months/or 50 HOURS of operation.
See Engine Owner’s Manual for detailed information.