


PREPARING THE APPARATUS
Inserting the batteries
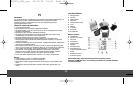
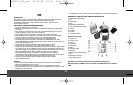
• Remove the battery cover (5) by pushing it in the direction of the arrow.
• Insert two AAA batteries. Check batteries are correctly polarised (see
diagram in battery compartment.) Replace the cover.
• Change the batteries when the battery symbol (g) is shown in the display (7).
• Caution! If the batteries are changed in less than 1 minute, you will not need
to reset the clock and any saved blood pressure readings (see below) will
remain in the apparatus memory. If it takes more than 1 minute to change the
batteries, the display will show all symbols for a moment. The apparatus will
emit a short beep and is reset. Any saved blood pressure readings are
deleted. The display then shows the reset time.
Setting the clock
• Press and hold the on/off button (10) until the year number flashes on the
display. Use the R-button (9) to set year. Press on/off button when setting is
correct.
o If you hold the button down, the display will change faster.
• The month number now flashes on the display. (Please note! The apparatus
shows the month before the date). Enter the month number in the same way
as the year number, and press the on/off button when it is correctly set.
• The date, hour number and minute number now flash in turn and are set in
the same way as described above.
• The display now shows the date (f) and time/year (h).
OPERATING THE APPARATUS
Preparing for a blood pressure reading
• Sit or lie down for 5-10 minutes before the reading.
• Avoid eating, smoking, exercising, bathing or drinking alcohol, coffee or tea
before taking the reading.
• Do not go to the toilet immediately before the reading.
• Do not take a blood pressure reading if you are excited, stressed or tense.
•Relax during the reading and do not talk.
Blood pressure reading
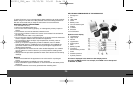
• Place the armband (4) on one of your wrists so that the apparatus is on the
underside of your arm and tighten it using the Velcro strap.
o It does not matter if you take the reading on your left or right wrist.
o The armband should be taut but should not pinch.
o The side of the armband facing your hand must be 0.5-1 cm from the hand.
• Place the arm to be measured on a pillow on the table with the palm facing
upwards and the apparatus at roughly the same height as your heart.
o Failure to do so can result in an inaccurate reading.
• Switch on using the on/off button.
• Two beeps will be heard and the number 0 flashes on the display. Shortly
afterwards, the armband is pumped up to 185 mmHg, while the pressure is
continuously shown on the display.
o The apparatus will buzz while the armband is being pumped up.
•When the armband is pumped up to 185 mmHg, the displayed figure falls
again and the blood pressure reading starts.
o The apparatus emits a number of beeps while the reading is being taken.
o The pulse is also measured, and the pulse symbol (e) is shown on the
display.
o The armband is automatically pumped up if the pressure is too low.
•Once the blood pressure reading has been taken, a long beep is heard and
the display shows the systolic pressure (I), the diastolic pressure (k), the
pulse (j) and the time.
28
630012_IM6_rev 23/10/06 10:42 Side 28