OPERATION - REMOVAL (Switch OFF the Controller)
TRAY ASSEMBLY
FITTING - OPERATION INSTRUCTIONS
IMPORTANT: ENSURE THAT THE JOYSTICK CONTROL UNIT IS SWITCHED OFF BEFORE
FITTING, REMOVING OR ADJUSTING THE TRAY ASSEMBLY.
The tray assembly comes ready assembled and is designed to fit to either the left or right hand side of
the wheelchair.
The cut-out section is to accommodate the Joystick Control unit and determines which side the tray is
fitted i.e. Joystick Control fitted to the right hand side, therefore the tray fixings will be fitted to the left
hand side, and vice-versa.
Follow these simple instructions to fit:-
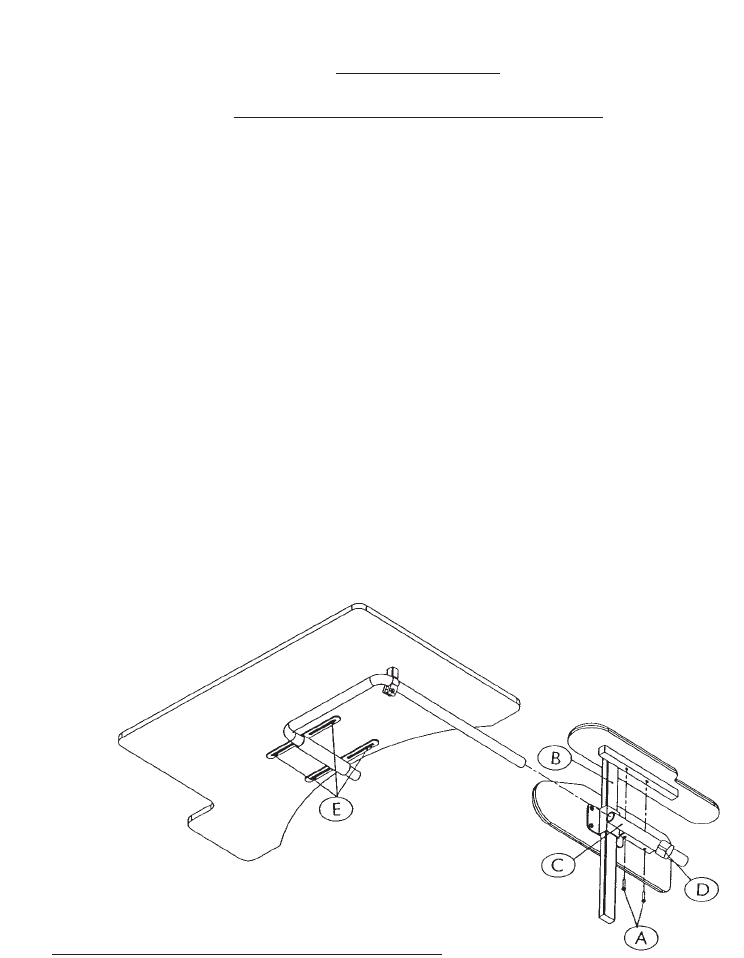
1. Remove the two screws A holding the arm pad to armrest support tube B.
2. Fit the slide mounting tube C beneath the armrest support tube using the existing screws, (see
diagram). Tighten the screws securely, (do not over tighten as this will damage the T-nut inserts
within the arm pad).
3. Loosen the wing screw D and slide the tray support tube extension into the slide mounting tube C.
4. With the occupant seated in the chair, adjust the tray to a comfortable working position, tighten
wing screw D.
5. Side to side lateral adjustment can be achieved by loosening the 4 screws E and sliding the tray
surface to the required position.
6. Ensure the tray is firmly positioned, level and central to the occupant’s requirements.
OPERA
TION - REMOVAL (Switch OFF the Controller)
The Tray can be placed to the side or removed completely to allow the occupant to get in and out of the
chair safely.
To do this, loosen the wing screw D, lift the tray and place to the side of the chair or remove completely
by pulling the tray assembly forward.
Do not attempt to drive the chair with the tray placed to the side as this may be hazardous to the
occupant and other people.
27


