


5
INSTALLATION/ADJUSTMENT OVERVIEW (FIGURE 1)
WARNING
For proper installation of the Infinity LoBack and to reduce the risk of pressure sores, the adjustment
procedures in this manual MUST be performed in the following order:
1. Adjusting the Mounting Hardware/Height
2. Adjusting the Depth Hardware
I
N
F
O
R
M
A
T
I
O
N
IMPORTANT INFORMATION
The best way to avoid problems related to pressure sores
is to understand their causes and your role in a skin man-
agement program.
Your therapist and physician should be consulted if you
have any questions regarding weight relief, self-exami-
nation of skin, or individual limitations and needs.
All cushions should be selected carefully. Working with
your therapist, physician and equipment supplier is the
best way to assure that a cushion choice matches your
individual needs.
As the needs of the client become more complex, the
cushion evaluation becomes more important.
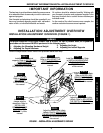
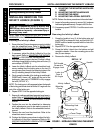
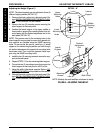
INSTALLATION/ADJUSTMENT OVERVIEW
STEP 1
Install the cane
clamps onto the
wheelchair. Refer to
INSTALLING/
REMOVING CANE
CLAMPS in PRO-
CEDURE 1 of this
manual.
FIGURE 1 - INSTALLATION/ADJUSTMENT OVERVIEW
O
V
E
R
V
I
E
W
IMPORTANT INFORMATION/INSTALLATION/ADJUSTMENT OVERVIEW
3. Adjusting the Angle
4. Adjusting the Lateral Supports
STEP 2
Install/remove the lateral
supports. Refer to
INSTALLING/
REMOVING THE
LATERAL SUPPORTS in
PROCEDURE 2 of this manual.
STEP 8
Adjust the lateral supports.
Refer to
ADJUSTING THE
LATERAL SUPPORTS in
PROCEDURE 4 of this
manual.
STEP 3
Install the back cushion. Refer
to
INSTALLING/REMOVING
THE BACK CUSHION in
PROCEDURE 2
of this manual.
Follow the steps below in order. Refer to the procedure below each step.
STEP 6
Adjust the depth of the Infinity
LoBack. Refer to
ADJUSTING
THE DEPTH HARDWARE in
PROCEDURE 4 of this manual.
STEP 5
Adjust the height of the Infinity
LoBack. Refer to
ADJUSTING
THE MOUNTING HARDWARE/
HEIGHT in PROCEDURE 4 of
this manual.
STEP 4
Install the Infinity LoBack.
Refer to
INSTALLING/
REMOVING THE INFIN-
ITY LOBACK in PROCE-
DURE 3 of this manual.
STEP 7
Adjust the angle.
Refer to
ADJUST-
ING ANGLE in
PROCEDURE 4 of
this manual.