


SECTION 12—BATTERIES
300 and 400 56 Part No. 1118395
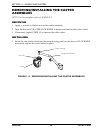
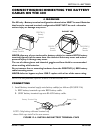
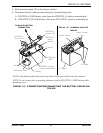
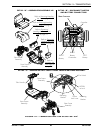
ƽ WARNING
When connecting the battery cables to the batteries, the battery cables MUST be
connected to the battery terminals/posts as shown in FIGURE 12.5, otherwise dam-
age to the battery cable may result when installing battery terminal caps.
2. Connect battery cable(s) to battery(ies) terminal(s)/post(s):
A. NEGATIVE (-) BLACK battery cable to NEGATIVE (-) battery terminal/post.
B. POSITIVE (+) RED battery cable to POSITIVE (+) battery terminal/post.
3. Secure the battery cable(s)/ring terminal(s) to the battery terminal(s)/post(s), BLACK
to NEGATIVE (-) and RED to POSITIVE (+), with the provided 1/4-20 x 5/8-inch hex
flange screw and hex flange locknut. Securely tighten.
4. Verify all battery cable(s)/ring terminal(s) are correctly installed and securely
tightened.
5. Slide terminal cap(s) down battery cable(s) and onto battery clamps.
6. Secure each terminal cap in place with a tie-wrap [use tie-wraps 11-1/2-inches long].
Refer to Detail “A” of FIGURE 12.5.
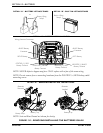
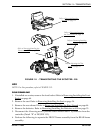
7. Remove the seat. Refer to Removing/Installing the Seat on page 34.
8. Remove the rear shroud. Refer to Removing/Installing the Rear Shroud on page 44.
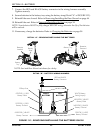
9. Position the batteries on the scooter. Refer to Removing/Installing the Batteries on 400
on page 53.
NOTE: New Battery(ies) MUST be fully charged BEFORE using, otherwise the life of the
battery(ies) will be reduced.
10. If necessary, charge the battery(ies). Refer to Charging the Batteries on page 58.
11. Install the rear shroud. Refer to Removing/Installing the Rear Shroud on page 44.
12. Install the seat. Refer to Removing/Installing the Seat
on page 34.
DISCONNECTING
ƽ WARNING
The use of rubber gloves and chemical goggles and face shield is recommended
when working with batteries.
NEVER allow any of your tools and/or battery cable(s) to contact BOTH battery
terminal(s)/post(s) at the same time. An electrical short may occur and serious per-
sonal injury or damage may occur.
1. Remove the seat. Refer to Removing/Installing the Seat
on page 34.
2. Remove the rear shroud. Refer to Removing/Installing the Rear Shroud
on page 44.
3. Remove the batteries. Refer to Removing/Installing the Batteries on 400 on page 53.
4. Cut the tie-wrap that secure each the battery terminal cap in place.