


23
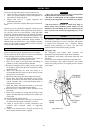
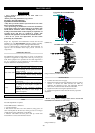
Accessing the Brake
Refer to same disassembly instructions in the Maintenance
Manual SAM0208
2HP & 4 HP with Emergency Stop and Overload
Refer to same disassembly instructions in the Maintenance
Manual SAM0208
Reduction Housing
Refer to same disassembly instructions in the Maintenance
Manual SAM0208
Chain guide Housing
Refer to same disassembly instructions in the Maintenance
Manual SAM0208
Clear Inspection & repair
Cleaning
Use the following procedures to clean, inspect and repair
the components of the hoist.
CAUTION
• Bushings that rotate in the frame or are loose or worn
must be replaced. Failure to observe this precaution will
result in additional component damage.
Clean all hoist component parts in solvent (except for the
friction discs). The use of a stiff bristle brush will facilitate
the removal of accumulated dirt and sediments on the gears
and frames. If bushings have been removed, it maybe
necessary to carefully scrape old Loctite ® from the
bushing bores. Dry each part using low pressure, filtered
compressed air.
Inspection
All disassembled parts should be inspected to determine
their fitness for continued use. Pay particular attention to
the following:
1. Inspect all gears for worn, cracked or broken teeth.
2. Inspect all bushings for wear, scoring or galling.
3. Inspect shafts for ridges caused by wear. If ridges caused
by wear are apparent on shafts, replace the shaft.
4. Inspect all threaded items and replace those having
damaged threads.
5. Measure the thickness of the friction disc. Replace the
friction discs if the grooves are no longer visible.
Repair
Actual repairs are limited to the removal of small burrs and
other minor surface imperfections from gears and shafts.
Use a fine stone or emery cloth for this work.
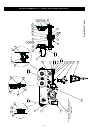
1. Worn or damaged parts must be replaced. Refer to the
applicable Parts Listing for specific replacement parts
information.
2. Inspect all remaining parts for evidence of damage.
Replace or repair any part which is in questionable
condition. The cost of the part is often minor in
comparison with the cost of redoing the job.
3. Smooth out all nicks, burrs or galled spots on shafts,
bores, pins or bushings.
4. Examine all gear teeth carefully and remove nicks or
burrs.
5. Polish the edges of all shaft shoulders to remove small
nicks which may have been caused during handling.
6. Remove all nicks and burrs caused by lockwashers.
Assembly
Brake
Refer to same Assembly instructions in the Maintenance
Manual SAM0208
2HP & 4 HP with Emergency Stop and Overload
Refer to same Assembly instructions in the Maintenance
Manual SAM0208
Reduction Housing
Refer to same Assembly instructions in the Maintenance
Manual SAM0208