


21
Disassembly
WARNING
• Disconnect the air supply hose before performing any
maintenance or repairs on this hoist.
General Instructions
All maintenance work done on the Liftchain hoist should be
performed on a bench in a clean dust free work area. In
the process of disassembling the hoist, observe the
following:
1. Never disassemble the hoist any further than is necessary
to accomplish the needed repair. A good part can be
damaged during the course of disassembly.
2. Never use excessive force when removing parts. Tapping
gently around the perimeter of a cover or housing with a
soft hammer, for example, is sufficient to break the seal.
3. Do not heat a part with a flame to free it for removal,
unless the part being heated is already worn or damaged
beyond repair and no additional damage will occur to
other parts. In general, the hoist is designed to permit
easy disassembly and assembly. The use of heat or
excessive force should not be required.
4. Keep the work area clean to prevent dirt and other
foreign matter from getting into bearings and other
moving parts. 5. All seals and 'O' rings should be
discarded once they have been removed. New seals and
'O' rings should be used when assembling the hoist.
6. When grasping a part in a vise, always use leather- or
copper-covered vise jaws to protect the surface of the
part and help prevent distortion. This is particularly true
of threaded members, machined surfaces and housings.
7. Do not remove any part which is press fit in or on a
subassembly unless the removal of the part is necessary
for repairs or replacement.
8. To avoid damaging bearings during hoist assembly or
disassembly always tap or press on the bearing inner
race for shaft fit bearings or the outer race for bore fit
bearings.
9. For assembly work above body height, suitable working
platforms or ladders should be made available.
10. Do not attempt to wash sealed bearings.
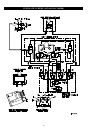
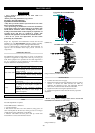
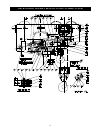
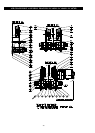
If hoists are to be completely disassembled it is
recommended that the motor assembly and brake/gear
housing assembly be removed as complete assemblies from
the chain guide housing. This can be accomplished by
removing the capscrews, nuts and washers that clamp the
housings together. Carefully separate assemblies and clean
mating surfaces. Assemblies are Loctited together.
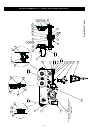
The muffler is located in the top of the gear housing. To
clean muffler remove retainer ring in gear housing and with
the aid of small pick remove the first muffler plate. Remove
'O' ring, second muffler plate and last 'O' ring.
Load Chain Replacement
WARNING
• NEVER splice a load chain except when installing a
new load chain by the following method. Always discard
the link used to connect the old chain with the new.
Excessive chain wear cannot be detected by casual
observation. The chain is case hardened and once the case
hardening is worn through, wear will progress rapidly and
the strength of the chain will be considerably reduced.
Further, the chain will no longer fit the chain sprocket
properly, greatly increasing the chance of malfunction and
chain breakage.
One chain sprocket will outlast several chains if the chain is
replaced as recommended. The use of a worn chain will
cause the chain sprocket to wear rapidly.
If the chain is visibly damaged, examine the chain sprocket
and chain guide. Install a new chain sprocket if the old one
is visibly worn. Install a new guide if the old one is broken
or distorted.
NOTICE
• For ease of installation, do not remove the old chain
from the hoist. Use the old chain to feed the new chain
through the hoist.
1. The hoist must be hung and connected to the air supply.
Reduce air pressure to 60 psi (4 bar).
2. Remove chain bucket, if used.
3. Remove free end of chain from hoist body, if attached.
Remove chain buffer and limit stop.
4. Remove the load hook.
5. Run hoist slowly in the lifting direction until the chain
free end is approximately 2 ft (60 cm) from the hoist.
6. Using an abrasive wheel, cut a section from the last link.
Use a 'C' link which is the same size as the chain.
CAUTION
• Do not distort the link in any manner. It must be able
to pass over the pocket and idler wheels without
binding.
7. Connect the new chain to the old chain by hooking the
end of the new chain onto the 'C' link. Make certain the
welds and links on the new chain match the positioning
of the welds and links on the chain being replaced.
CAUTION
• Ensure that chain does NOT become twisted during
reeving. All chain welds must align while chain is
hanging free.
8. Slowly run the hoist in the raise direction, running off the
old chain and reeving the new chain over the chain
wheel.
The first link of new chain over the chain wheel must
be a standing link.
9. Reinstall the load hook, chain buffer and limit stop
WARNING
• A twisted chain can jam as it passes over the pocket
wheel, possibly resulting in damage to the hoist or even
breaking the chain and causing injury.