


Y8610U INTERMITTENT PILOT RETROFIT KIT
68-0291—03 10
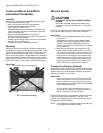
Install the Gas Control
WARNING
FIRE OR EXPLOSION HAZARDCAN CAUSE
PROPERTY DAMAGE, SEVERE INJURY, OR
DEATH.
Follow these warnings exactly:
1. Do not bend the pilot gas tubing at the gas control
or at the pilot burner after the compression fitting is
tightened. Gas leakage at the connection can
result.
2. Always install a sediment trap in the gas supply
line to prevent contamination of the gas control.
3. Do not force the gas control knob. Use only your
hand to turn the gas control knob. If the gas control
knob does not operate by hand, the gas control
should be replaced by a qualified service techni-
cian. Force or attempted repair can result in a fire
or explosion.
IMPORTANT
These gas controls are shipped with protective seals
over the inlet and outlet tappings. Do not remove the
seals until ready to connect the piping.
Converting Between Natural and LP Gas
WARNING
FIRE OR EXPLOSION HAZARDCAN CAUSE
PROPERTY DAMAGE, SEVERE INJURY, OR
DEATH.
1. Do not attempt to use a gas control set for natural
gas on LP gas or a gas control set for LP gas on
natural gas.
2. When making a conversion, main and pilot burner
orifices must be changed to meet appliance manu-
facturer specifications.
To convert from natural gas to LP, use the 393691 LP
Conversion Kit that is included with the Y8610U Intermittent
Pilot Retrofit Kit. To convert from LP to natural gas, use the
394588 Natural Gas Conversion Kit (ordered separately).
Step-opening gas controls cannot be converted.
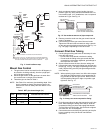
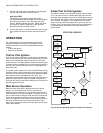
To convert control from one gas to another:
1. Turn off the main gas supply to the appliance.
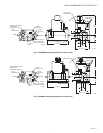
2. Remove the regulator cap screw and pressure regulator
adjusting screw. See Fig. 3 or Fig. 4 on page 5.
3. Remove the existing spring.
4. Insert the replacement spring with the tapered end down.
See Fig. 10.
5. Install the new plastic pressure regulator adjustment
screw so that the top of the screw is flush (level) with the
top of the regulator. Turn the pressure regulator adjust-
ment screw clockwise six complete turns. This provides
a preliminary pressure setting of about 10.0 in. wc (2.5
kPa) for LP regulator and 3.5 in. wc (0.9 kPa) for natural
gas regulator.
6. Check the regulator setting either with a manometer or
by clocking the gas meter. See “Checkout” on page 15.
7. Install the new cap screw.
8. Mount the conversion label on the control.
9. Install the control and appliance according to the appli-
ance manufacturer instructions.
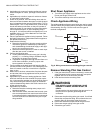
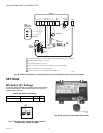
Fig. 10. Installation of conversion kit in regulated
gas control.
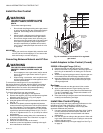
Install Adapters to Gas Control (if used)
393690-14 Straight Flange (3/4 in.)
1. Remove the seal over the gas control inlet or outlet.
2. Make sure that the O-ring is fitted in the flange groove. If
the O-ring is not attached or is missing, do not use the
flange.
3. With the O-ring facing the gas control, align the gas con-
trol threaded holes with the flange clearance holes.
4. Insert and tighten the screws provided with the flange.
Tighten the screws to 25 inch pounds of torque to pro-
vide a gas tight seal.
Bushings
1. Remove the seal over the gas control inlet or outlet.
2. Apply a moderate amount of good quality pipe com-
pound to the bushing, leaving the two end threads bare.
For an LP installation, use a compound resistant to LP
gas. Do not use Teflon tape.
3. Insert the bushing in the gas control and thread the pipe
carefully into the bushing until tight.
Install Gas Control Piping
All pipe must comply with local codes and ordinances or with
the National Fuel Code (ANSI Z223.1 NFPA No. 54),
whichever applies. Tubing installation must comply with
approved standards and practices.
1. Use new, properly reamed pipe free from chips. If tubing
is used, ensure that ends are square, deburred, and
clean. All tubing bends must be smooth and without
deformation.
2. Run the new pipe or tubing to the gas control. When tub-
ing is used, obtain a tube-to-pipe coupling to connect the
tubing to the gas control.
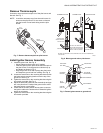
3. Install a sediment trap in the gas supply line. See Fig. 11
on page 11.
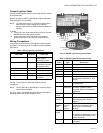
COLOR CODE FOR
LP
GAS
NATURAL
GAS
CAP SCREW BLACK SILVER
PRESSURE
REGULATOR
ADJUSTING
SCREW
WHITE WHITE
SPRING
RED
STAINLESS
STEEL
PRESSURE
REGULATOR
HOUSING
M8083A